
If you’re following the Microsoft 365 and Copilot ecosystem, you have probably heard that we have agents now. 😊 Joking aside, we distinguish between two types of agents in the Microsoft 365 ecosystem:
- Declarative agents, which are agents that are built on top of the Microsoft 365 Copilot platform and that users can leverage from the Copilot Chat experience. Makers and developers can customize a declarative agent by providing a custom set of instructions, define one or more knowledge sources (like a website or a SharePoint site) and add a set of actions, like sending a mail or retrieving data from a 3rd party data source. You can learn more here. Being built on top of Microsoft 365 Copilot, declarative agents use the same LLMs, orchestration engine and UI.
- Custom Engine Agents, which are agents that can offer a completely customized experience. You can use your own LLMs and orchestration engine, and you can publish them across multiple channels: Microsoft 365, Teams, a custom web application, a mobile application, etc.
In the Microsoft ecosystem, both type of agents can be built with two approaches:
- Makers can use Copilot Studio, a low-code tool that allows them to create agents using a simplified experience, based on a visual designer and the wide range of Power Platform connectors.
- Pro developers can use the Teams Toolkit, an extension for Visual Studio and Visual Studio Code that accelerate the development of Teams and Copilot apps based on .NET, TypeScript or Python.
Until not long ago, declarative agents and custom engine agents were two disconnected experiences. Declarative agents shows up in the right sidebar of the Copilot Chat experience: users can chat with them by clicking on their name (to use the immersive experience) or they can mention them in the standard Microsoft 365 Copilot chat to leverage the in-context experience.
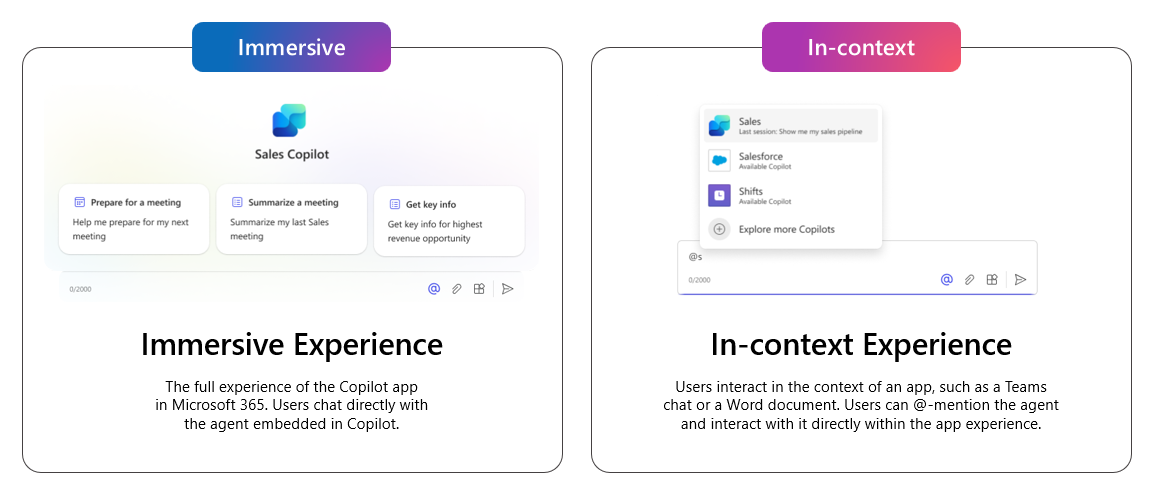
Custom engine agents, instead, could be integrated into the Microsoft 365 ecosystem only as Teams applications: users can see them as personal apps (so they show up in the left sidebar of Teams) or in the chat history.
Many customers, however, expressed the interest of using the Copilot Chat as a single entry point for all the agentic experiences in the organization. The distinction between a declarative agent and a custom engine agent is a technical implementation detail that should not be visible to the end user. For this reason, Microsoft is rolling out the capability to use Custom Engine Agents in Microsoft 365 Copilot Chat. In this blog post, we’re going to explore how you can do that both with Copilot Studio and the Teams Toolkit.
The timeline for the rollout is the following one: Public Preview: From early February 2025 and expect to complete in mid-March 2025. General Availability (Worldwide): From late March 2025 and expect to complete by early April 2025. As such, if you still don’t see it available, don’t worry. It’s a gradual rollout, so it might just not be available in your tenant yet.
Adding a custom engine agent to Copilot Chat using Copilot Studio
When you create or edit a custom engine agent in Copilot Studio, one of the most important tabs is the one called Channels, which you can use to make the agent available across multiple platforms: Teams, Slack, Facebook, a custom website, etc. If your tenant already received the new capabilities, you will see that the Teams channels has been rebranded as Teams + Microsoft 365:

When you click on it, you will have the usual option to add it as a channel, but you will see also a new checkbox labeled Make agent available in Microsoft 365 Copilot.
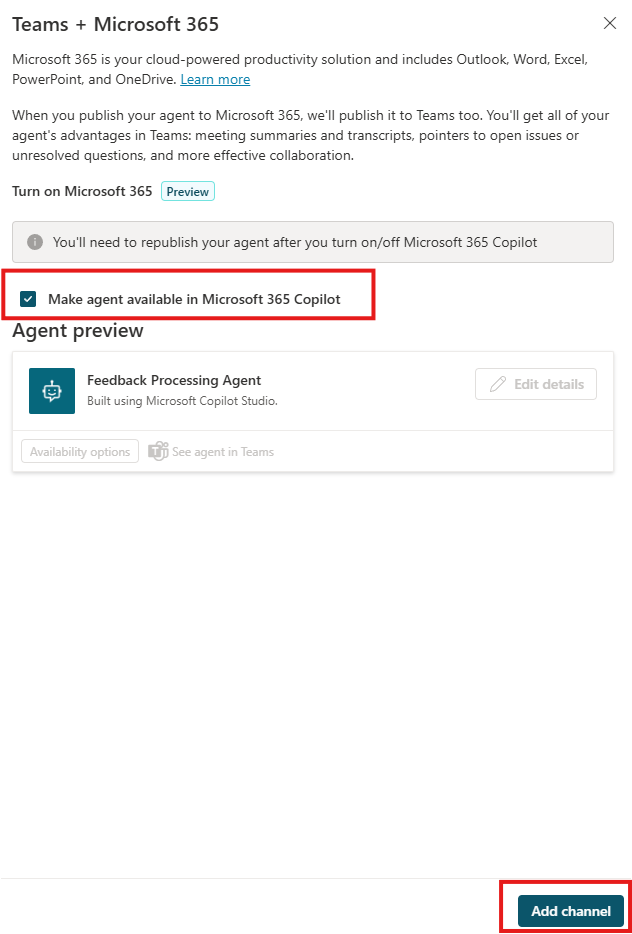
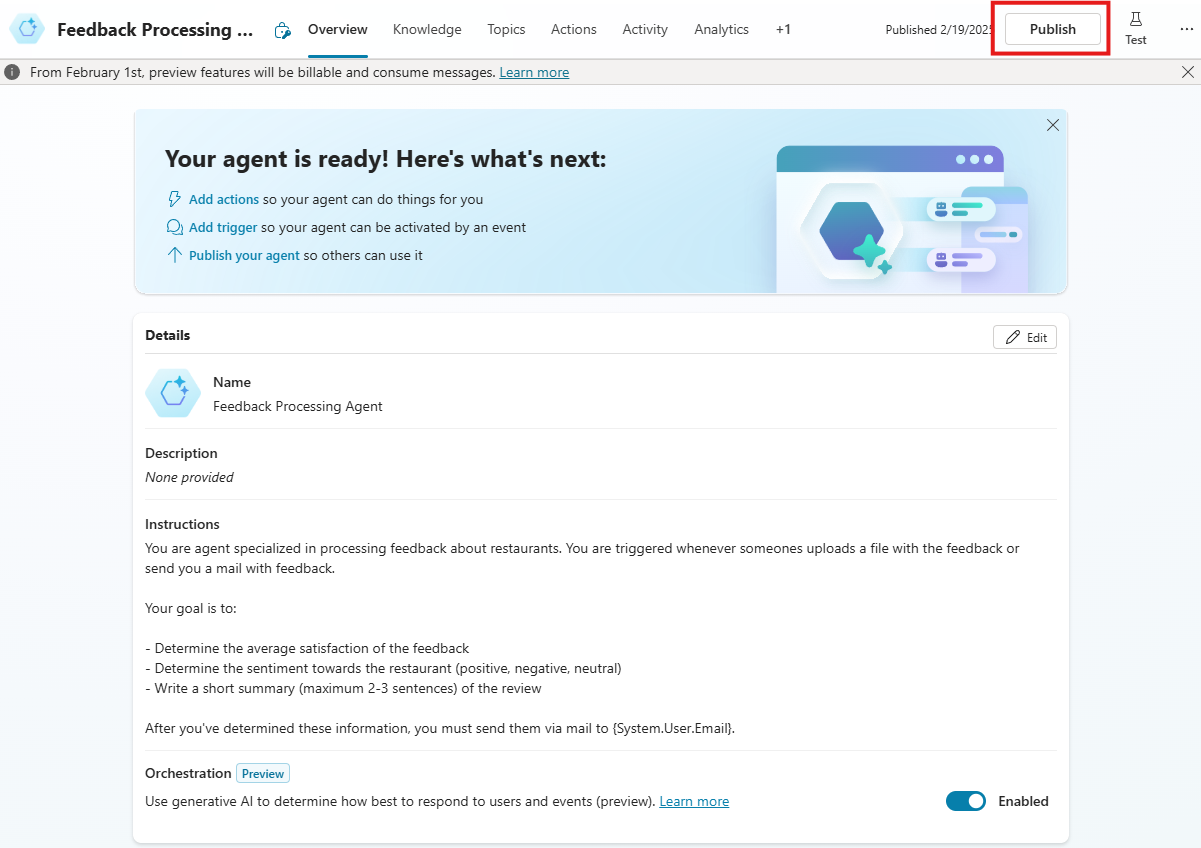
As the note in the panel says, if you have an existing custom engine agent you have created in the past and which is already available in Teams, you will need to republish it after you turn on the option to make it available in Microsoft 365 Copilot. You can do it by clicking on the Publish button in the main page of your agent:
To make sure that the new version with the Microsoft 365 Copilot integration shows up in your organizational catalog, I strongly suggest you to make any change in one of the agent’s properties, like the description or developer’s name. This way, you’ll increase the version number, making sure that the new version will be submitted for approval. You can do this by clicking on Edit details in the Agent preview section of the Teams + Microsoft 365 channel.
Now you can go back to the Teams + Microsoft 365 channel and, under Availability options, click on Show to everyone in my org to start the process of submitting the agent to the application catalog of your organization:
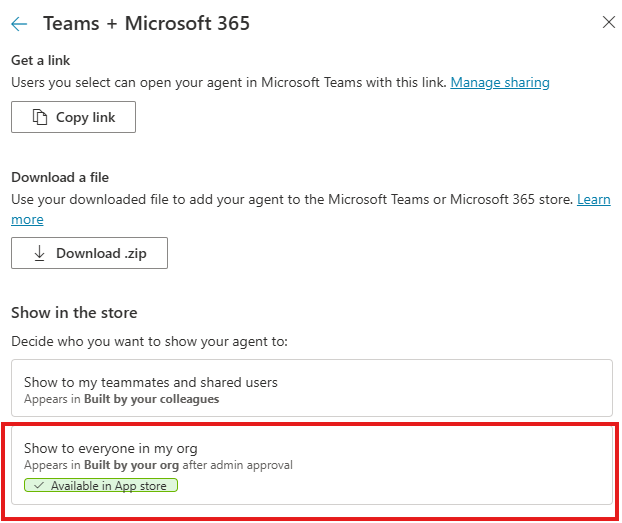
From this option, you can click on Submit for admin approval to start the submission process. Once completed, it’s now the turn of the Microsoft 365 tenant administrator to approve the agent from the Integrated Apps section of the admin portal. You will see the agent under the Requested apps section, and you can notice immediately that there’s an important difference compared to the custom engine agents you might have previously created and published:

The one at the top (Feedback Processing Agent) is a custom engine agent that was created before the new capability was rolled out. As you can see, the only supported host is Teams. The one at the bottom (Travel Insight Agent) was created, instead, enabling the new option to make the agent available in Copilot. As you can see, in fact, other than Teams, the agent is also available in Copilot as a host.
Once the agent has been approved by the tenant administrator, it will show up in the Microsoft 365 and Teams catalog, under the Built for your org section:
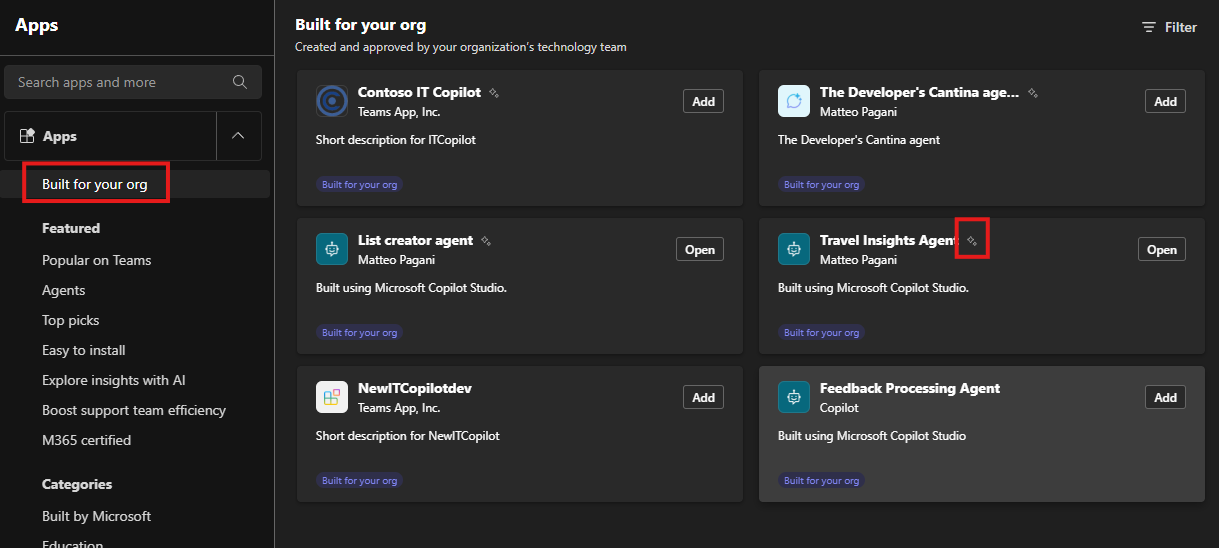
You can notice here as well that there’s a way to immediately recognize agents that can be integrated into Copilot Chat: agents like Travel Insights Agent and List creator agent support the new option, so there’s a little sparks icon after their name. Feedback Processing Agent, instead, hasn’t been updated to support the new capability, so the icon is missing.
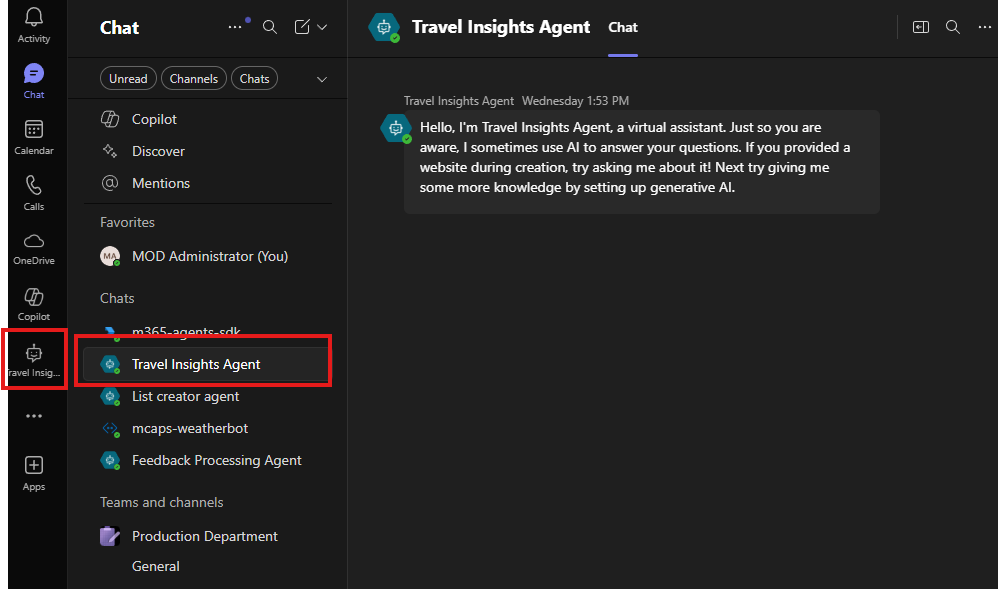
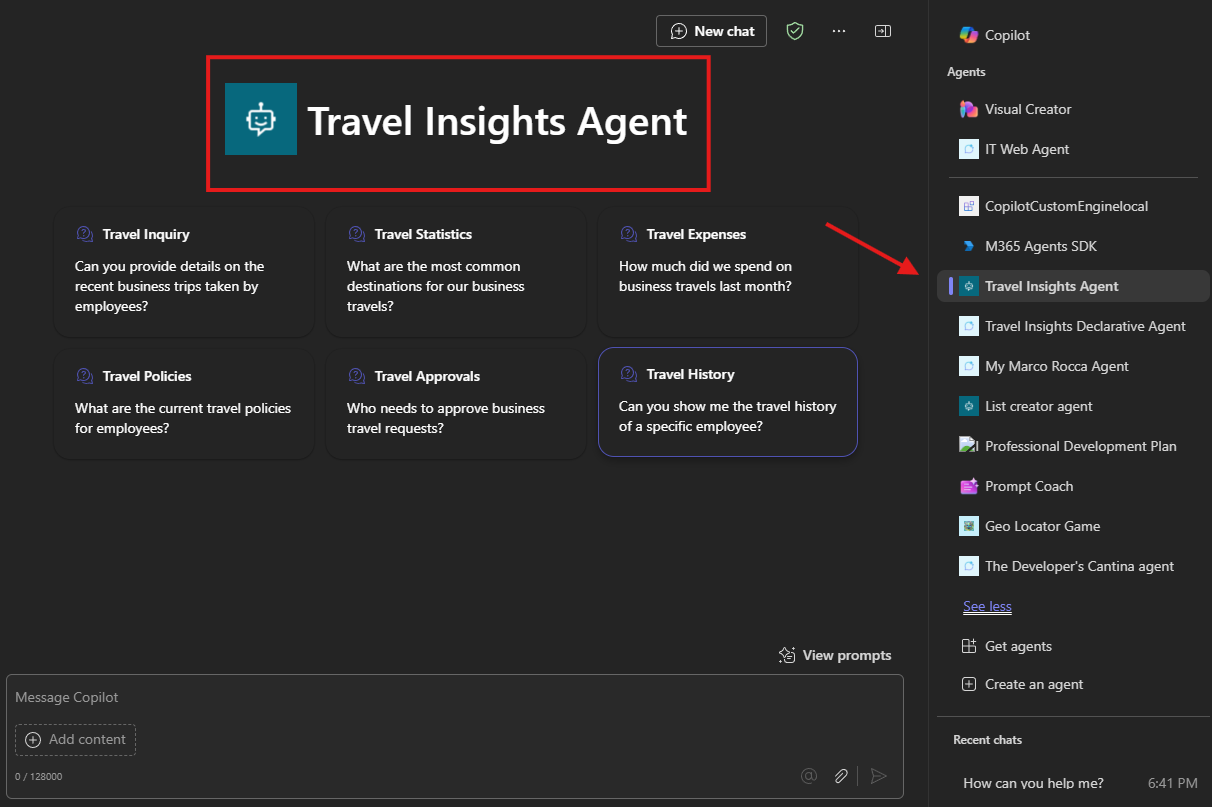
Once you click on Add to install the agent for your user, you will see that it will show up in the Copilot Chat experience, alongside any other declarative agent you might have:
Adding a custom engine agent to Copilot Chat using the Teams Toolkit
When it comes to agents created with a pro-code approach, the integration between the agent and Microsoft Teams as a channel is managed by the Azure Bot Service. The Azure Bot Service is a service that allows you to create, manage and publish agents that, similarly to Copilot Studio, can be published to multiple channels, like Teams, Slack, Facebook, etc.

However, since we aren’t anymore in a low code scenario, the Azure Bot Service doesn’t provide any feature to build your agent, but it acts only as a middle man between your agent and the channels. You’ll need to provide, in fact, the URL of the messages endpoint of the agent you have built using the Bot Framework:
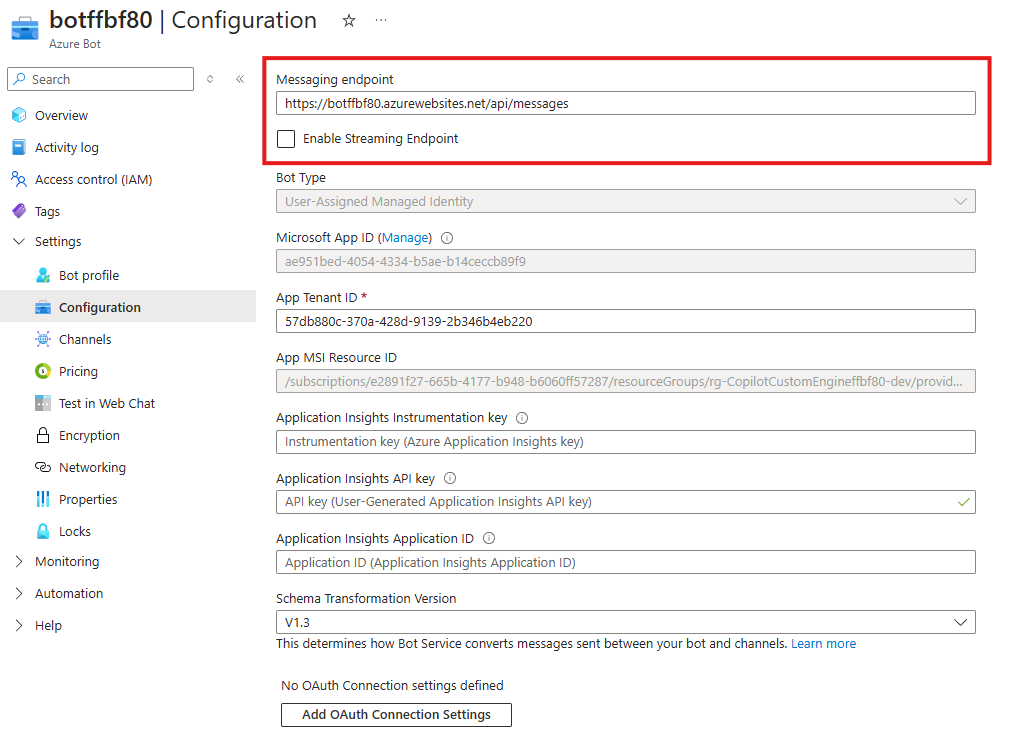
For this reason, the Azure Bot Service doesn’t require any new feature to support publishing a custom engine agent in Copilot Chat. It’s enough to keep using the Teams channel.
The change must be done at the Teams Toolkit level, specifically inside the manifest of a Teams application. The starting point is an agent created with one of the available pro-code options: it could be the Teams Toolkit for Visual Studio Code, if you want to use TypeScript or Python; it could be the Teams Toolkit for Visual Studio, if you want to use .NET; it could be the new Microsoft 365 Agents SDK, which is a new iteration of the Bot Framework SDK.
Regardless of the technology you choose, your agent will always be encapsuled into a Teams application, which has a manifest file that describes its capabilities.
Let’s take the Teams Toolkit for Visual Studio Code as an example, which we can use to create a custom engine agent powered by the Teams AI library, which facilitates integrating Generative AI capabilities into your agent. In the Teams Toolkit tab (the Teams logo in the Visual Studio Code sidebar), click on Create a New App and choose Custom Engine Agent.
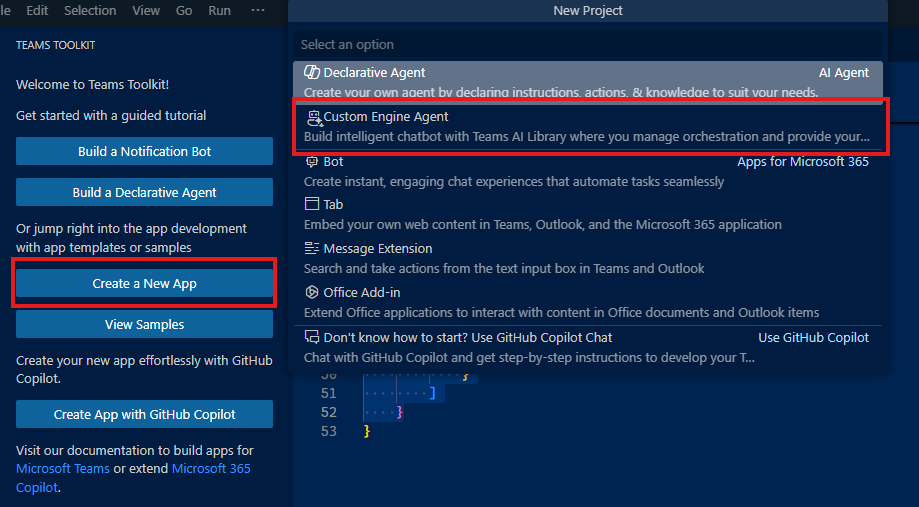
For the sake of this post, let’s go with the simplest scenario, which is Basic AI Chatbot, then pick up the language you prefer between JavaScript, TypeScript and Python. The next step is to choose with AI provider you want to use:
- In case you choose OpenAI, you will need to provide the API key and the name of the model you want to use.
- In case you choose Azure OpenAI, you will need to provide the API key, the URL endpoint and the deployment name.
At the end of the process, the Teams Toolkit will create a base project with everything you need to support the basic experience, which is an agent powered by a Large Language Model.
What’s interesting for us, for the purpose of this blog post, is the appPackage folder, which contains all the files that compose a Teams application: the manifest and two icons.
Let’s focus on the manifest.json file. At the time of writing this post, the manifest will use the latest version of the Teams schema, which is 1.19. You wil find this information in the manifestVersion property of the JSON:
|
|
In order to use the new Copilot Chat integration capability, we must switch to the developer preview of Teams apps, by doing two changes:
- Change the
$schemaproperty tohttps://developer.microsoft.com/en-us/json-schemas/teams/vDevPreview/MicrosoftTeams.schema.json - Change the
manifestVersiontodevPreview.
This is how the first lines of the manifest should look like:
|
|
The next step is to add a new section called copilotAgents at the root level of the manifest. If you have ever built a declarative agent with the Teams Toolkit, this section will be familiar to you, since it’s where you can define that your application includes a declarative agent. With the devPreview version of the manifest, we can add custom engine agents as well, as in the following example:
|
|
The customEngineAgents property is a collection, since your application can host more than one custom engine agent. For each of them, you must specify two properties:
- The
typeproperty, which can be onlybotas of today. - The
idproperty, which is the ID of the agent you have created in the Azure Bot Service.
If you use the ${{BOT_ID}} placeholder, the Teams Toolkit will take care of replacing this value with the actual bot id that has been registered on the Azure Bot Service.
One of the most useful features of the Teams Toolkit, in fact, is the capability of automatically provisioning all the resources that are needed to run your agent:
- It’s going to deploy the Azure Bot Service on your Azure subscription.
- It’s going to register an application in Microsoft Entra to manage the authentication.
- It’s going to create a Dev Tunnel so that you can test your agent locally.
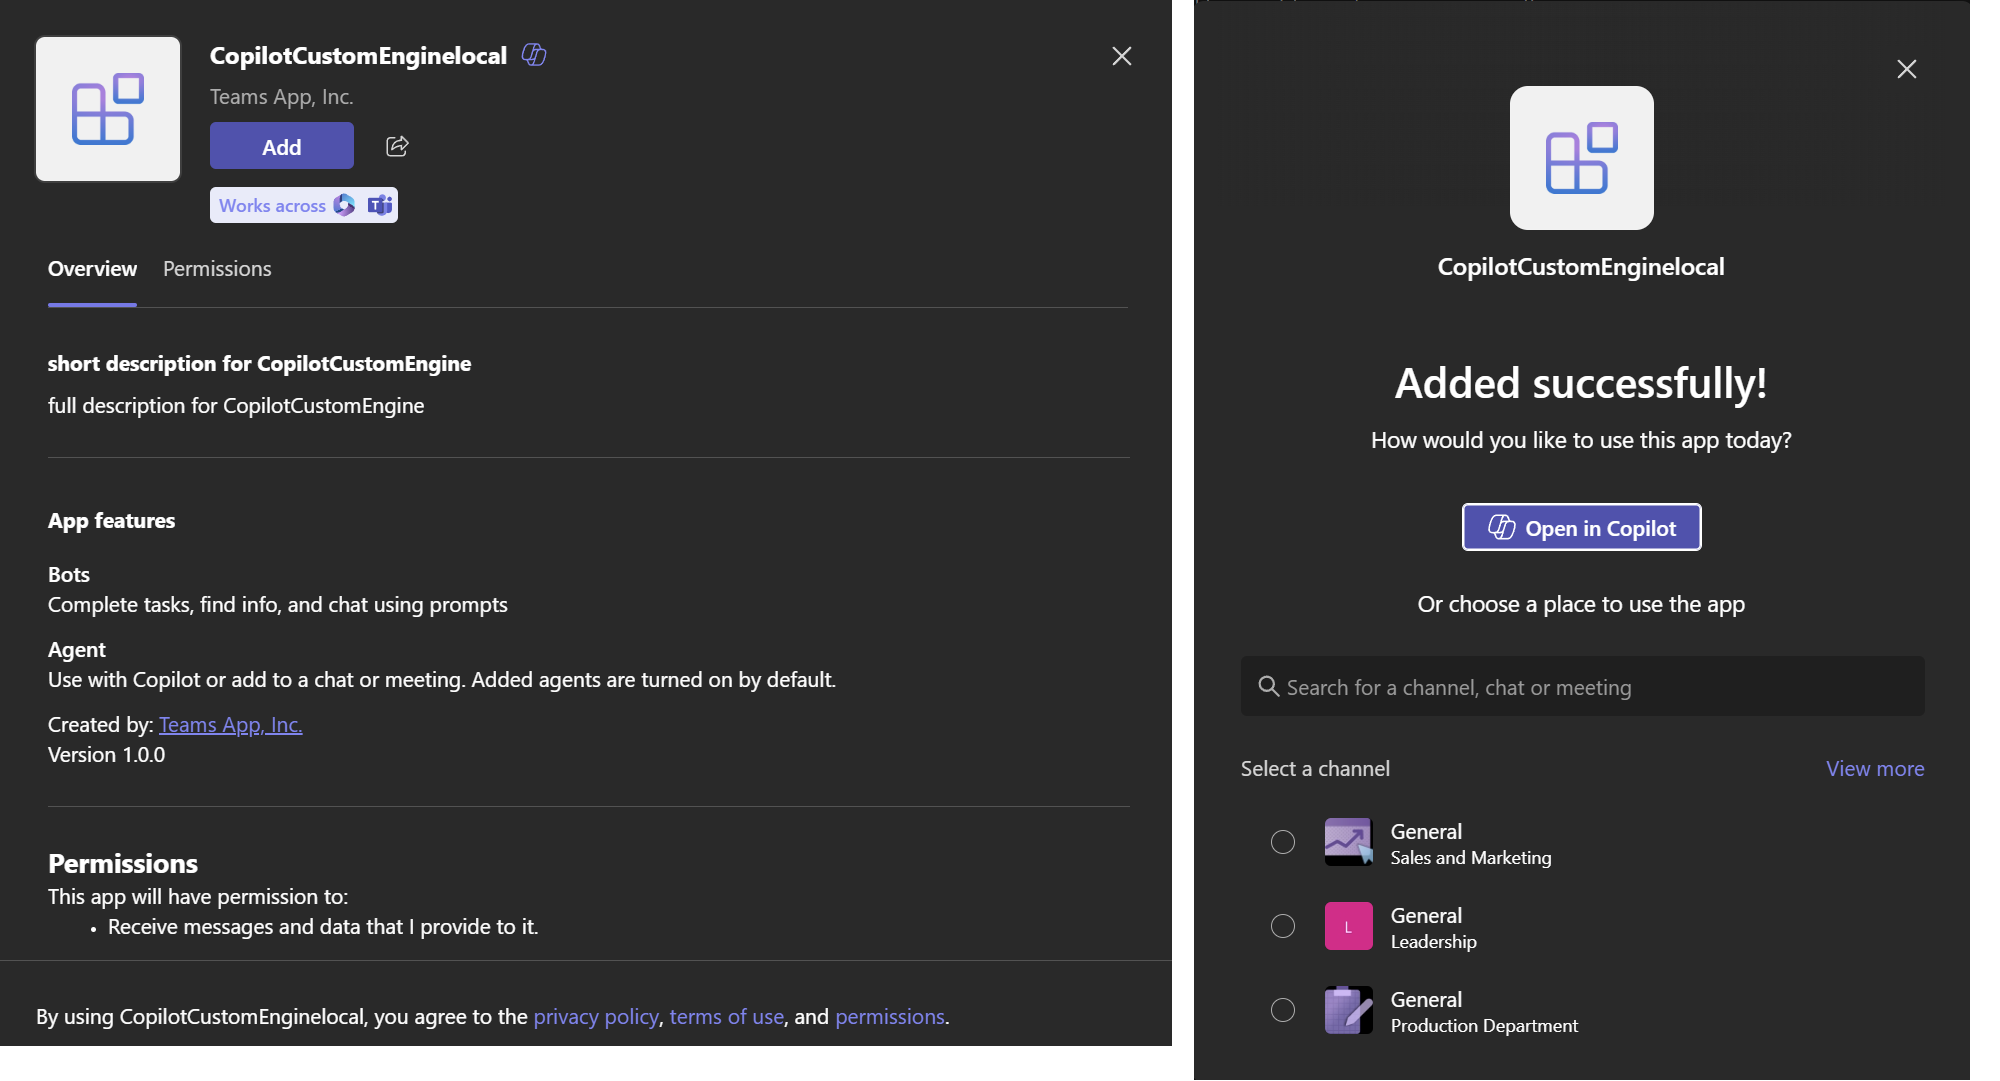
That’s it. Now, if you want, you can test your agent in your tenant. First, you must make sure that, in the Teams Toolkit panel, you are signed in both with your Azure subscription and your Microsoft 365 account in the Accounts section. Then, under the Debug and Run section in Visual Studio Code, just click on Debug in Teams (Edge). The Teams Toolkit will start to deploy all the required resources and, at the end of the process, a new instance of Edge will open up directly on Teams, with the pop-up to install the agent, followed by the option to open it right into Copilot:
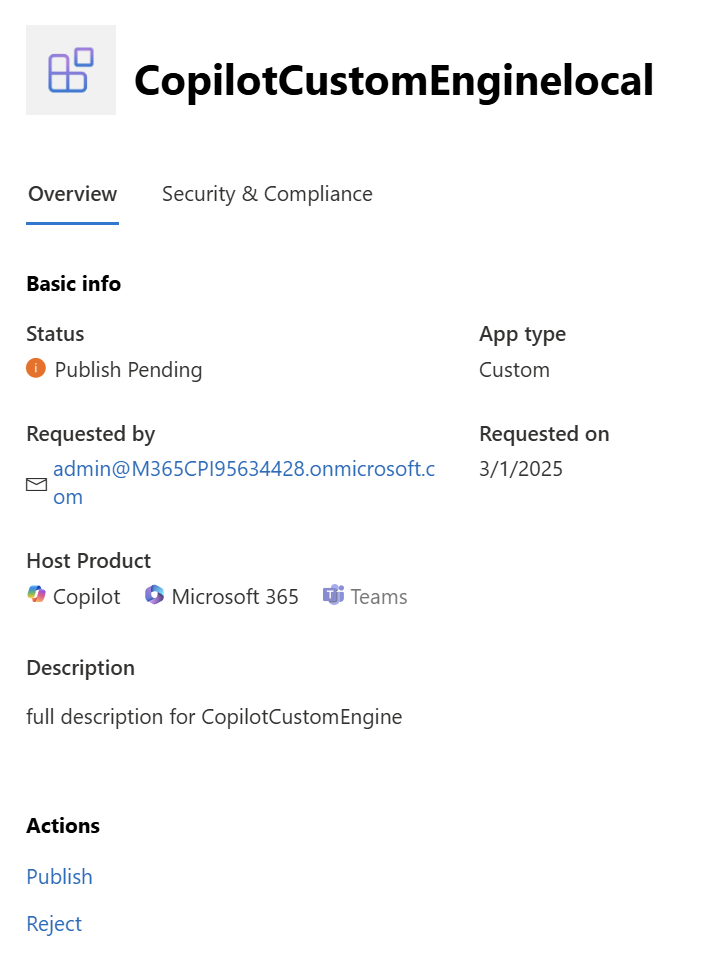
You can notice how, like we have seen with Copilot Studio, the agent will have the Copilot logo near its name. And if you decide to publish it in the organizational catalog, also in this case you will see the Host application isn’t just teams, but Copilot as well:
And now, exactly like we have seen with Copilot Studio, you can install the agent in your tenant and start to use it right in the Copilot Chat experience:
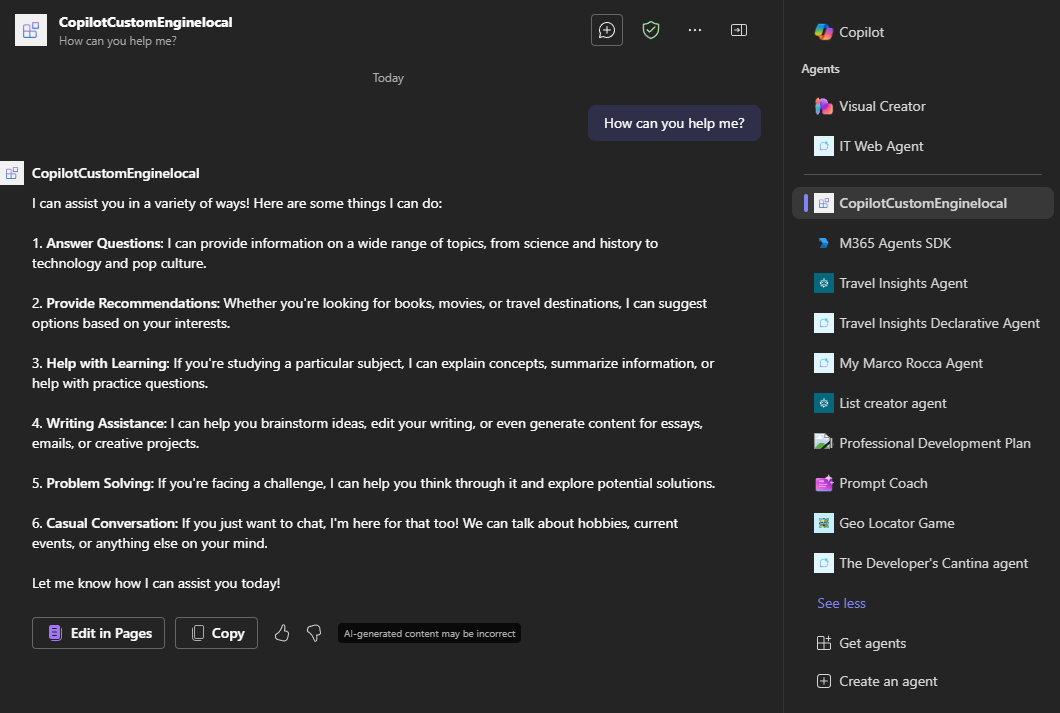
Voilà!
Wrapping up
In this post, we have explored a new exciting capability that is being rolled out to the Microsoft 365 Copilot ecosystem: the ability to use Custom Engine Agents in Microsoft 365 Copilot Chat. This feature greatly improves the user experience for employees in your organization, since now they can use agents from a single entry point, regardless of the technology and the approach used to build them. This is an important milestone towards the Microsoft vision of Copilot as the “UI for AI”.
Happy coding!