
Please note! Declarative copilots and API plugins are currently in private preview. As such, if you want to put in practice what you’re going to read in this post, you need to be part of the private preview program (which isn’t open for submissions at the moment) or wait until the features will be publicly released. However, all the information you’re going to find in this post are public. Even if you can’t actually build them, declarative copilots and API plugins have been unveiled at Build and they are publicly documented. I will make sure to update the post once the feature will go live.
If you have ever worked with Copilot for Microsoft 365, I’m pretty sure at some point someone from your company came up with the following requirements: “Can I restrict the scope of Copilot for Microsoft 365 so that it can give me answers starting only from a specific data source, like a SharePoint site?”. Copilot for Microsoft 365, in fact, is very powerful but, for some scenarios, it might be too powerful. For example, let’s say that you want your employees to easily get answers about the IT policies of the company. In this scenario, you’ll probably want Copilot to ground its responses only from the official internal SharePoint site for the IT department, instead of using every document or information that might be on SharePoint, OneDrive or in your emails. Up until today, the only answer to this scenario was to build a custom copilot, either with Copilot Studio or with a pro-code solution like the the Teams AI library. It’s a good solution, but it introduces a level of complexity: being a custom solution, you need to take care of setting up the LLM, the deployment, the hosting, finding the right channel to use, etc.
In this blog post, we’ll build a declarative copilot using the pro code approach with the Teams Toolkit.
A little bit of context
Declarative copilots are one of the elements of the Copilot for Microsoft 365 extensibility story. Up until Build, the two main components of the extensibility story were plugins and connectors. Their goal was to enable customers to integrate 3rd party platforms into the Copilot ecosystem:
- With Graph Connectors, you can expand the Copilot knowledge, by importing external data into the Microsoft 365 tenant. This way, Copilot can generate answers not only from your Microsoft 365 data (documents on SharePoint, meetings, mails, etc.), but also from data coming from another platform like SAP, Jira Cloud, Salesforce or your own LOB application.
- With plugins, you can expand the Copilot capabilities, by enabling it to get data and perform actions related to a 3rd party platform. For example, by building a plugin for your support ticket platform, you enable Copilot to generate answers starting from your tickets, or to change the status of a ticket with a prompt.
In addition to these two options, now you can add declarative copilots into the picture, which serve a slightly different purpose, but they are still heavily connected with the whole extensibility ecosystem. As we mentioned in the beginning of the post, in fact, a Declarative Copilot is a way to build a customized Copilot, but still based on the Copilot for Microsoft 365 foundations: the AI models, the orchestration engine, the safety features, etc. When you create a declarative copilot, you can customize the following options:
- You can provide your own set of instructions, which will act as a system prompt. This way, you can instruct Copilot to behave the way which is more compliant for your scenario. Let’s take the IT scenario we introduced before: you could provide a system prompt that instructs the LLM to answer only to questions related to IT topics and to ignore every other question.
- You can provide a list of conversation starters, which are suggested prompts that are displayed when you use the declarative copilot.
- You can provide a list of SharePoint / OneDrive files and folders. The declarative copilot will use only them to ground its responses.
- You can turn the web plugin on, enabling the declarative copilot to use results from the web to ground its responses.
Among these features, declarative copilots participate into the extensibility ecosystem since they can use plugins and connectors. This means that:
- You can provide a list of plugins that the Copilot will automatically use.
- You can provide a list of Graph Connectors that the Copilot will be able to use to ground responses on external data.
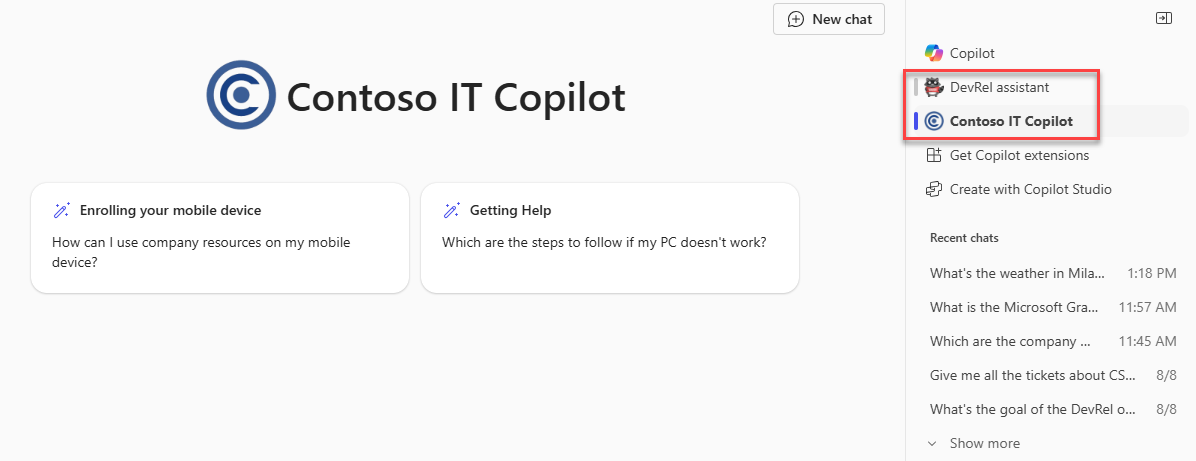
You can clearly see that declarative copilots are based on the Copilot for Microsoft 365 architecture because the starting point to use them is, indeed, the Copilot for Microsoft 365 application. There are two ways to use a declarative copilot:
-
From the right panel in Copilot. At the top, before the chat history, you will find a list of all the declarative Copilots that are available to you. When you click on the new chat icon near a declarative copilot, you will start a focused session with it.
-
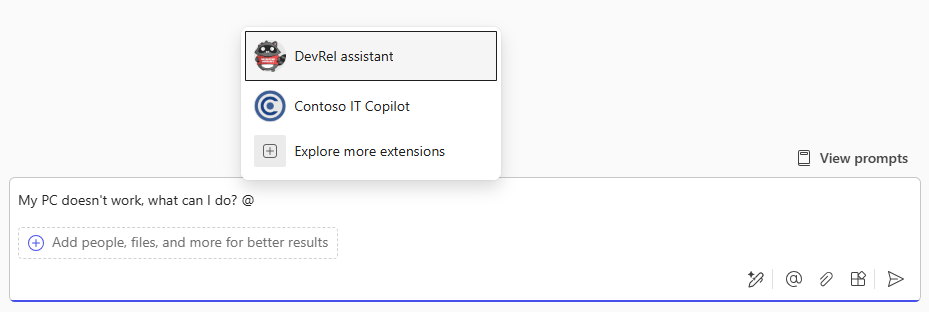
From the main Copilot chat, you can use the @ symbol to reference your declarative copilot and “forward” the prompt to it:
Now that we have understood what’s the purpose of a declarative copilot and how to use it, let’s create one!
Create our first declarative copilot
An important concept to share before we start is that a declarative copilot doesn’t include any code. Since you’re using the Copilot for Microsoft 365 engine behind the scenes, you don’t have a way to customize it or change it. All the configurations happen through a JSON file, which you’re going to use to setup all the scenarios we’ve highlighted before, like providing your own set of instructions or restricting the knowledge source to a specific SharePoint site.
You’re going to see this soon. The easiest way to create a declarative copilot is by using the Teams Toolkit, so make sure you have installed it in Visual Studio Code. You’ll need the pre-release version, the standard version doesn’t support the new extensibility options yet. Then, open a new instance of Visual Studio Code, click on the Teams Toolkit icon in the sidebar and choose Create a New App. The first option you’ll see is Copilot Extensions:
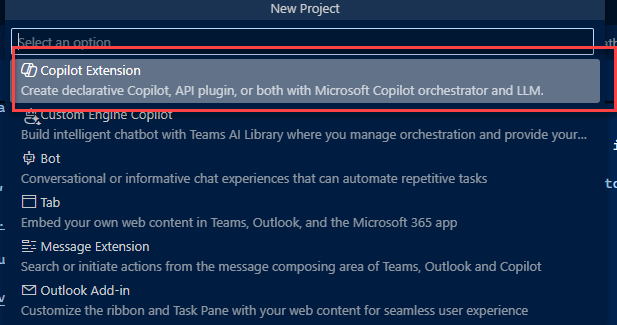
Pick up Declarative Copilot then, for the moment, choose No plugin. Select a folder in which you want to create the project and then give it a name. The Teams Toolkit will create the basic structure for your project:
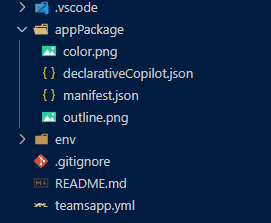
Once your project has been created, you will immediately realize what I just shared: the project doesn’t contain any JavaScript / TypeScript file or C# class, but just a bunch of JSON files and images.
The first file you’ll find is the manifest.json one, which shouldn’t come as a surprise if you have experience with developing extensions for Copilot for Microsoft 365. Declarative copilots are wrapped as Teams application, so this is the standard manifest which describes the application and it includes information like the package id, the name, the descriptions, etc.
The only special component is the copilotExtensions section, which has been recently introduced to support all the Copilot extensibility scenarios. It’s a new section and, in fact, you can notice at the top of the file that the manifest is using a preview version of the schema:
|
|
Inside the copilotExtensions sections, we can see the declaration that this Teams application includes a declarative copilot:
|
|
As you can see, the definition is extremely simple: just an identifier (which is a fixed value, declarativeCopilot) and a reference to the JSON file which defines the configuration of the declarative copilot.
This is where things are more interesting. Let’s take a look at the declarativeCopilot.json file!
The declarative Copilot configuration
By default, the declarativeCopilot.json file includes a bunch of properties: name, description and instructions.
name and description are quite easy to understand and it’s important to customize them, because they will be displayed to the user when he chooses to use your declarative copilot.
The most important one is instructions, which is the prompt that will act as a system prompt. It should describe with as many details as possible the role of your declarative copilot, what it can do and what it can’t do.
For instance, let’s say that we’re building the IT Copilot for our company that we have taken as example in the beginning of the post. This is how your JSON file might look like:
|
|
We have crafted a set of instructions with two key features:
- We have defined an introductory phrase that the Copilot must use whenever it starts a new interaction. This is a good way for us, as developers, to make sure that the declarative copilot is indeed following our instructions.
- We have stated what it can do and what it can’t do. It’s an IT Copilot, so it should answer only questions related to this topic, otherwise it should say that it doesn’t know.
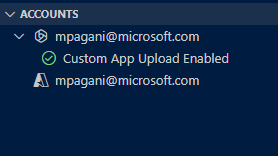
This is good enough to start testing your declarative copilot! These properties, in fact, are the minimum ones required to deploy it. Again, thanks to the Teams Toolkit, it’s a really easy operation. First, click on the Teams Toolkit icon in the Visual Studio Code sidebar. Then, make sure that at the top, in the Accounts section, you are logged in with your Microsoft 365 account and that the check Custom App Upload Enabled is green:
Now click on Provision, under the Lifecycle section. The Teams Toolkit will create a ZIP file with the manifest, the configuration file, the assets and it will sideload it on your Microsoft 365 tenant.
Please ignore the Deploy and Publish options in the Teams Toolkit. Unlike with other types of Teams applications (like custom copilots or message extensions), there is no infrastructure to deploy in this case, since there is no code. All the required files will bundled inside the ZIP file that gets uploaded to the tenant.
Once the operation is completed, go to the Microsoft 365 portal, login with your Microsoft 365 account and click on the Copilot icon in the left sidebar. You should see your declarative copilot showing up in the right pane, as you’ve seen in one of the previous screenshots.
Click on the new chat icon near it and try to ask some questions. You should observe that, if you ask a question which is related to a IT topic, your copilot will reply. If, instead, it’s totally out of topic, you should see the message I don’t know.
For example, the image below shows what happens when I ask What’s the weather in Milan in December?.
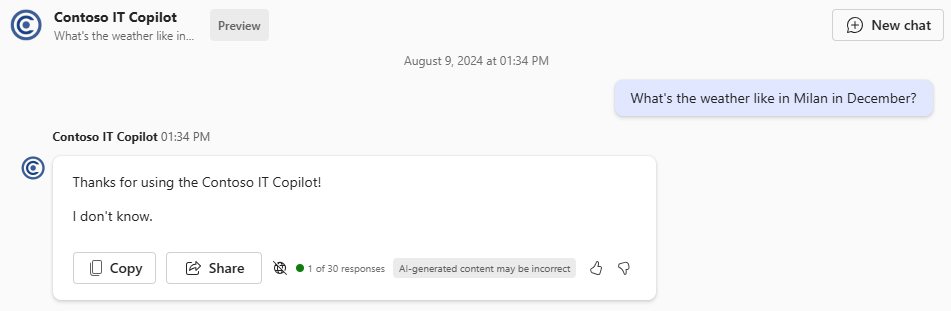
You can see that Copilot followed both our instructions:
- It started the response with the phrase “Thanks for using the Contoso IT Copilot!”.
- It replied that it doesn’t know the answer.
This is a good starting point, but the experience is a bit limited. Providing a set of instructions helped to narrow down the scope of our Copilot, but it misses access to the proper data and tools to respond correctly. Let’s see how we can add new capabilities!
Adding conversation starters
One thing you might have noticed when you have tried your declarative copilot is that, despite you are using a more scoped down version, Copilot is still suggesting generic Microsoft 365-related prompts, like Summarize the meeting X or Catch up on your tasks with Y. This can be misleading, because some of these prompts might not even work, given the new set of instructions we have provided.
Luckily, the configuration file easily supports replacing them with your own, thanks to a section in the JSON file called conversation_starters:
|
|
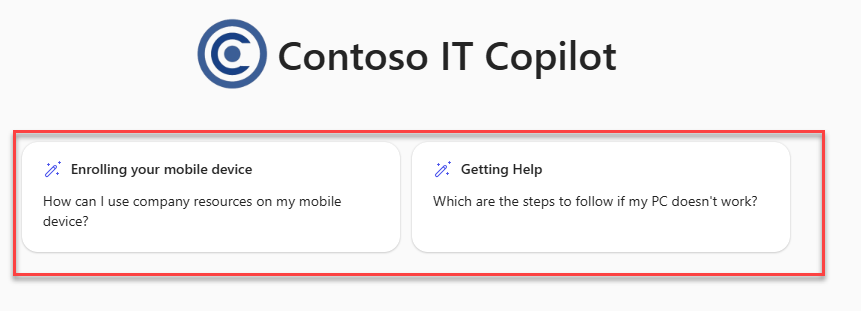
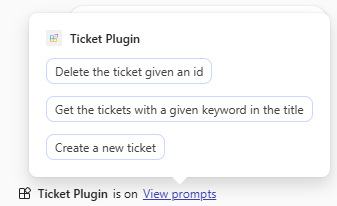
It’s simply a collection of key / value pairs, where title is the bold text shown at the top of the card, while text is the text shown in the middle. The following image will help you to understand how they are used:
Adding a SharePoint or OneDrive source
Now that we have customized the look and feel of our declarative copilot, let’s focus on the functionality. The most common requirement you get about when you decide to build a declarative copilot is scoping the data source. In our case, we want our IT Copilot to answer only using, as knowledge, the content that is published on the internal IT SharePoint site, instead of using every content available in the Microsoft 365 tenant.
You can specify one or more data source using the OneDriveAndSharePoint capability:
|
|
Inside this capability you can use the items_by_url property to specify the URL of one or more SharePoint or OneDrive locations. In this case, we have specified only one URL, which is the URL of the IT department SharePoint site. This means that our declarative copilot will use only the content that is published on this site to ground its responses.
You can test it by using again the Teams Toolkit to provision your declarative copilot and by asking questions which are covered by the content you have published on your SharePoint site. You’ll notice that, among the references listed at the bottom of the response, Copilot won’t list anymore mails, Teams messages or content from other sites other than the one you have specified in the configuration file.
Adding a Graph Connector
On this blog we have seen different posts covering what Graph Connectors are and how you can create custom ones. They are, essentially, treated like every other data source in Microsoft 365 (Exchange, Teams, SharePoint, etc.), except that the data has been imported from an external data source, like an internal wiki or a knowledge base. By default, Copilot can use this data source to ground its responses. With a declarative copilot, we can restrict it to use only one or more of the Graph Connectors that are available in the tenant. We can do this thanks to the GraphConnectors capability, as in the following sample:
|
|
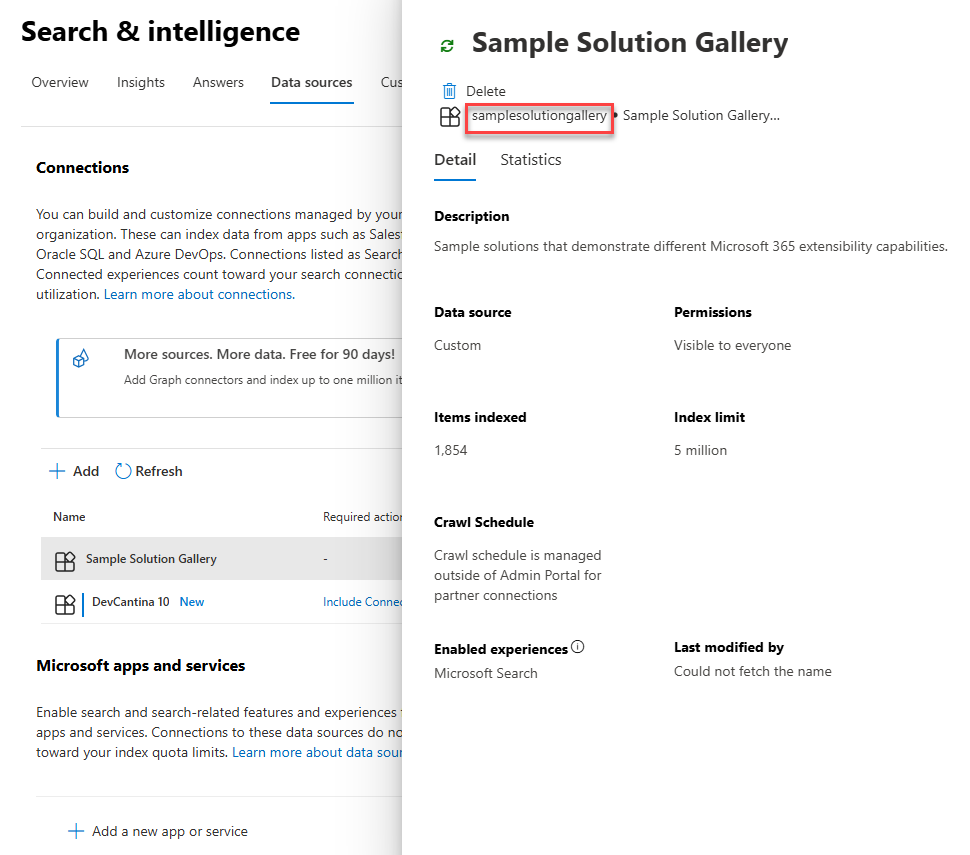
Inside the connections property, you can provide one or more connection_id properties, with the id of the connector you want to enable. If you have built the connector yourself, you should know the ID, since it’s the one you have provided when you have defined the connection’s configuration. In case you’re using one of the pre-built connectors, instead, you can find the ID by going to the Microsoft 365 Admin portal, heading to the Settings -> Search & Intelligence -> Data sources section and clicking on the connector you are interested to. A panel with all the details of the connector will open up, in the image below you can see highlighted in red the id:
Adding a plugin
The last capability we’re going to see is the ability to embed plugins which, as we mentioned in the beginning, are a way to integrate 3rd party platforms into the Copilot ecosystem. The two key differences compared to a Graph Connector are:
- Plugins are mapped around API calls, so they retrieve data in real time from the 3rd party platform. There is no data ingestion into the tenant, but there’s a real time interaction with an external platform.
- Plugins are used not just to expand knowledge, but also to perform actions.
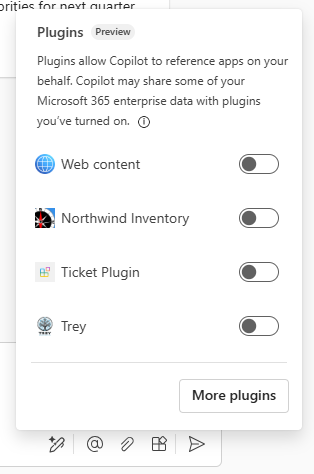
Plugins, like Graph Connectors, aren’t tied to declarative copilots, they can be used also with the standard Copilot for Microsoft 365 experience. In this scenario, however, you must manually open the plugin flyout and turn on the one (or the ones) you want to use and then explicitly refer to them:
However, when you bundle them together with a declarative copilot, they are automatically turned on. You don’t need to call them out explicitly but, if Copilot understands that a plugin can help to ground a response, it will use it.
The Teams Toolkit supports the option to create a declarative copilot with a plugin, using another one of the new extensibility features announced back at Build: API plugins. Up until today, the only way to create a plugin using a pro-code approach was with Message Extensions plugins, which are very flexible but they require you to write code to receive the query search from Copilot, to call the 3rd party platform to get the results and then to generate an Adaptive Card to return the information.
The idea behind API plugins, instead, is that most of the time, when you want to integrate a 3rd party platform, you just need to call the APIs that it offers. As such, API plugins don’t include any code, but they are wrapped around an OpenAPI definition. OpenAPI is a standard way to describe a REST APIs, using JSON or YAML. It simply describes all the available endpoints, the inputs and outputs, the authentication methods, etc. It’s agnostic, so it doesn’t contain any specific information about the implementation. Behind the scenes, you could have a .NET API hosted on Azure or a Node.js API hosted on AWS, it doesn’t matter.
For the rest of the post, I’m going to assume that you already have an API with an OpenAPI definition that you can leverage. Otherwise, you can easily build a test one with many technologies, like .NET Web APIs or Azure Functions. Both technologies offer built-in OpenAPI support, so you can generate an OpenAPI definition out of your ASP.NET Web API or Azure Function simply by decorating them with special attributes.
You can also use my sample Ticket API which I’ve published on GitHub.
The Teams Toolkit support generating the required files to integrate an API plugin for you. Open a new Visual Studio Code instance, click again on the Teams Toolkit icon, choose Create a new app and pick again Copilot Extension, then Declarative Copilot. This time, however, choose Add plugin in the next step, followed by Start with an OpenAPI Description Document. Then click on the first option, the one with the cloud icon called Enter OpenAPI Description Document location and provide the URL of your OpenAPI definition. If you have created your API with .NET Web APIs or Azure Functions and you’re using the Swagger integration, the URL will be something like https://yourapi.com/api/swagger.json (or https://yourapi.com/api/swagger.yaml, both formats are supported).
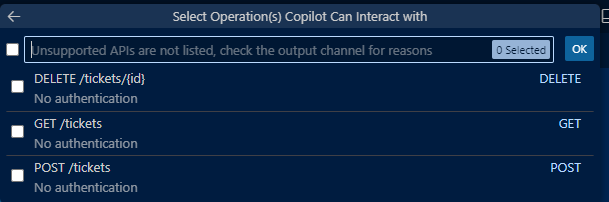
If the OpenAPI definition is properly formatted, the Teams Toolkit will identify the available operations and it will ask you one which ones you want to import. The following image shows what I get when I use my test API which simulates a ticket management platform. As you can see, it properly recognized the three supported operations:
- GET, to get the list of tickets
- POST, to create a new ticket
- DELETE, to delete a ticket
Once you have selected the operations you want to import, the Teams Toolkit will create two files for you inside the appPackage folder:
-
One called openapi.json (or openapi.yaml, depending on the source format you have used), which is basically a local copy of the OpenAPI definition API (eventually trimmed down, in case you have chosen to import only a subset of all the available operations). For example, this is how the file looks for my scoped down API (I’ve imported only the GET operation):
1 2 3 4 5 6 7 8 9 10 11 12 13 14 15 16 17 18 19 20 21 22 23 24 25 26 27 28 29 30 31 32 33 34 35 36 37 38 39 40 41 42 43 44 45 46 47 48 49 50 51 52 53 54 55 56 57 58 59 60 61 62 63 64 65 66 67 68 69{ "openapi": "3.0.1", "info": { "title": "Ticket APIs", "version": "1.0" }, "servers": [ { "url": "https://<my-api.com>/api" } ], "paths": { "/tickets": { "get": { "description": "Get the tickets with a given keyword in the title", "operationId": "GetTickets", "parameters": [ { "name": "search", "in": "query", "description": "The search keyword", "schema": { "type": "string" } } ], "responses": { "200": { "description": "OK", "content": { "application/json": { "schema": { "type": "array", "items": { "$ref": "#/components/schemas/ticket" } } } } } } } } }, "components": { "schemas": { "ticket": { "type": "object", "properties": { "id": { "type": "string" }, "title": { "type": "string" }, "description": { "type": "string" }, "assignedTo": { "type": "string" }, "severity": { "type": "string" } } } } } }As you can see, it’s just a description of the API: in this case, the
/ticketsendpoint can be called with a GET operation, which optionally supports a query string parameter calledsearch. The response is a JSON array of objects, each one representing a ticket. The ticket object has a few properties, likeid,title,description, etc. -
One called ai-plugin.json, which is a sort of enhanced version of the OpenAPI definition specialized for Copilot. It takes care of adding Copilot specific configurations, like name and descriptions (which are used by the model to determine if the plugin should be called), adaptive card to be used as part of the response, etc. This is an example file generated out of my Ticket API:
1 2 3 4 5 6 7 8 9 10 11 12 13 14 15 16 17 18 19 20 21 22 23 24 25 26 27 28 29 30 31 32 33 34 35 36 37 38 39 40 41 42 43 44 45 46 47 48 49 50 51 52 53 54 55 56 57 58 59 60 61 62 63 64 65 66 67 68 69 70 71 72 73 74 75 76 77 78 79 80 81 82{ "$schema": "https://aka.ms/json-schemas/copilot-extensions/v2.1/plugin.schema.json", "schema_version": "v2.1", "name_for_human": "Ticket Plugin", "description_for_human": "A plugin to manage tickets", "namespace": "ticketplugin", "functions": [ { "name": "GetTickets", "description": "Get the tickets with a given keyword in the title", "capabilities": { "response_semantics": { "data_path": "$", "properties": { "title": "$.title", "subtitle": "$.id" }, "static_template": { "type": "AdaptiveCard", "$schema": "http://adaptivecards.io/schemas/adaptive-card.json", "version": "1.5", "body": [ { "type": "Container", "$data": "${$root}", "items": [ { "type": "TextBlock", "text": "id: ${if(id, id, 'N/A')}", "wrap": true }, { "type": "TextBlock", "text": "title: ${if(title, title, 'N/A')}", "wrap": true }, { "type": "TextBlock", "text": "description: ${if(description, description, 'N/A')}", "wrap": true }, { "type": "TextBlock", "text": "assignedTo: ${if(assignedTo, assignedTo, 'N/A')}", "wrap": true }, { "type": "TextBlock", "text": "severity: ${if(severity, severity, 'N/A')}", "wrap": true } ] } ] } } } } ], "runtimes": [ { "type": "OpenApi", "auth": { "type": "None" }, "spec": { "url": "apiSpecificationFile/openapi.json" }, "run_for_functions": [ "GetTickets" ] } ], "capabilities": { "localization": {}, "conversation_starters": [ { "text": "Get the tickets with a given keyword in the title" } ] } }
As you can see, the file lists the same operations that are available in the OpenAPI definition. The whole definition of the operation is demanded to the OpenAPI specification (you can see that, in the runtimes section, we have a reference to the openapi.json file). However, on top of the definition, we are adding a few more properties which are Copilot specific, like:
- A name and a description
- A
response_semanticssection, which includes thepropertiessection (which specifies which are the key properties of our data that Copilot should ues when it references it) and thestatic_templateone (which is an Adaptive Card that Copilot will use to render the data). In this case, we have a simple Adaptive Card with a few TextBlocks, one for each property of the ticket.
Notice, at the end of the file, how also this file contains the conversation_starters section. This is because also plugins can have their own set of default prompts, which are displayed when a plugin is turned on.
The glue between a declarative copilot and the plugins it can use happens, as you can expect, in the declarativeCopilot.json file, with a new section called actions:
|
|
Each action has an id and a file property, which contains the path to the ai-plugin.json file.
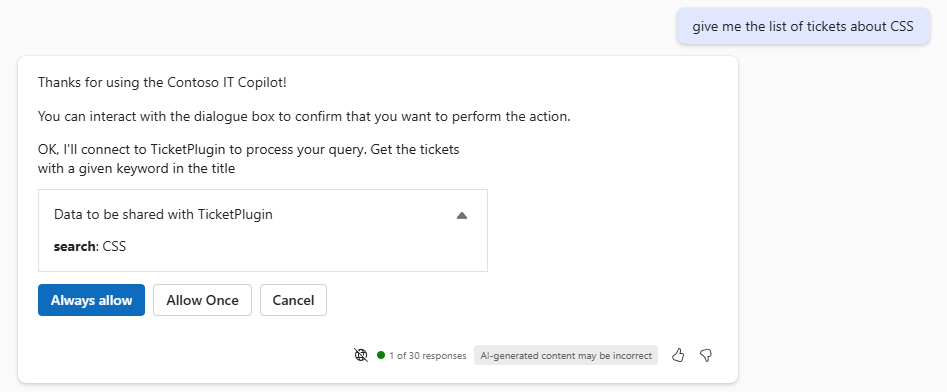
If you provision and test the declarative copilot, you won’t actually notice any different. As I mentioned, plugins are automatically turned on, you don’t have to manually activate them (in fact, the plugin flyout icon is disabled when you use a declarative copilot). However, if you write a prompt that requires using the plugin to perform the task, you will see your plugin being called. The first time you use it, you will be asked if you want to allow the plugin to access the data it needs. This is because, when Copilot invokes the plugin, is effectively sending data outside your tenant, since the search query is passed to an external API. You can see also see a preview of the data that will be shared with the API.
In the image below, you can see how Copilot has translated the prompt Give me the list of tickets about CSS into an API call passing, as value for the search parameter, the keyword CSS:
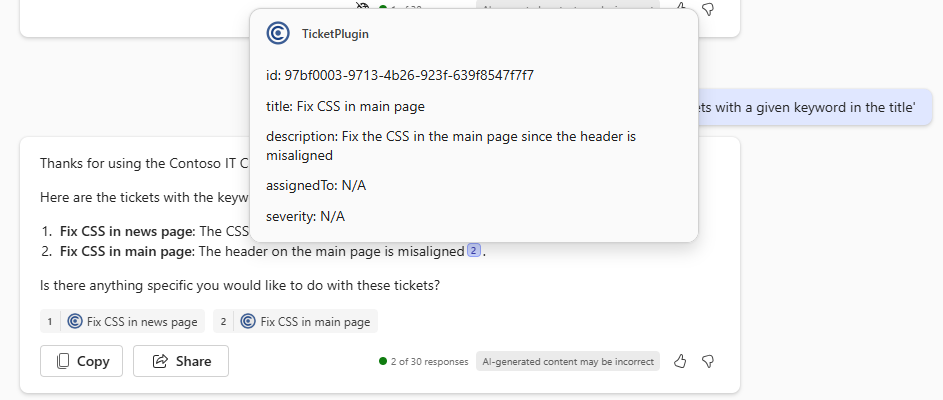
If you proceed, Copilot will get the data from the API and use it to generate a response. If you have provided an Adaptive Card for the selected operation, you will see it rendered when you hover one of the references (or directly in the UI, in case the response includes only a single result).
As I mentioned, unlike Graph Connectors, plugins can be used also to perform actions. The image below shows what happens after I have configured my plugin to include not just the GET operation, but also the POST one, which is used to create new tickets:
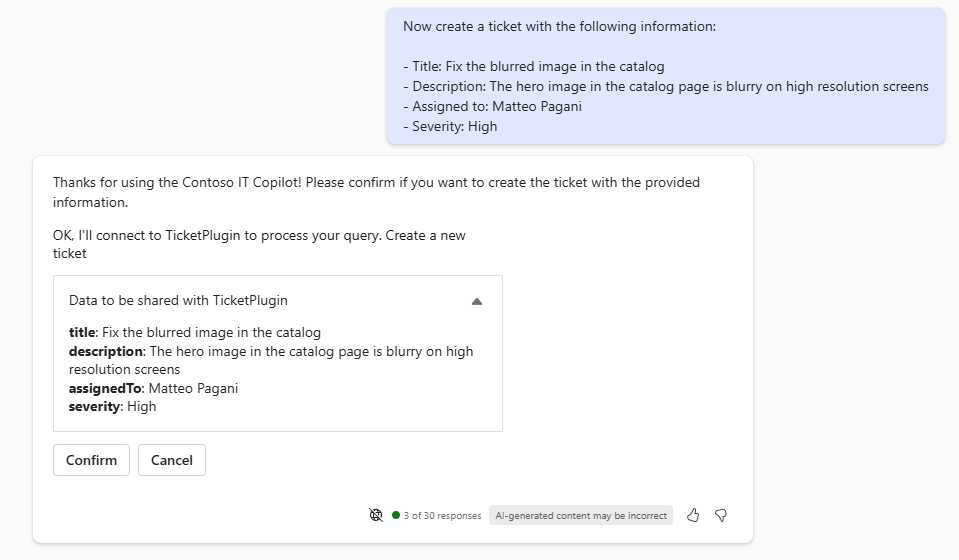
In this case, since the plugin is actually going to write data on the 3rd party platform, Copilot will always ask you to confirm the operation. You don’t have a way, unlike for reading operations, to always allow them.
Using a plugin outside a declarative copilot
If you want to use a plugin outside the scope of a declarative copilot and make it available as a general Copilot for Microsoft 365 plugin, the Teams Toolkit gives you the option to create a standalone one by choosing Create a New App -> Copilot Extension -> API plugin. The flow is exactly the same: you will be asked to provide the OpenAPI definition of the API and the Teams Toolkit will generate the same files: a local copy of the OpenAPI definition and an ai-plugin.json file. In fact, you can take an existing plugin you have imported in a declarative copilot and make it standalone, if you want.
The only difference is that, in case of a standalone plugin, instead of being declared as action in the declarativeCopilot.json file, it’s declared in the manifest.json file of the application, in the copilotExtensions section, like this:
|
|
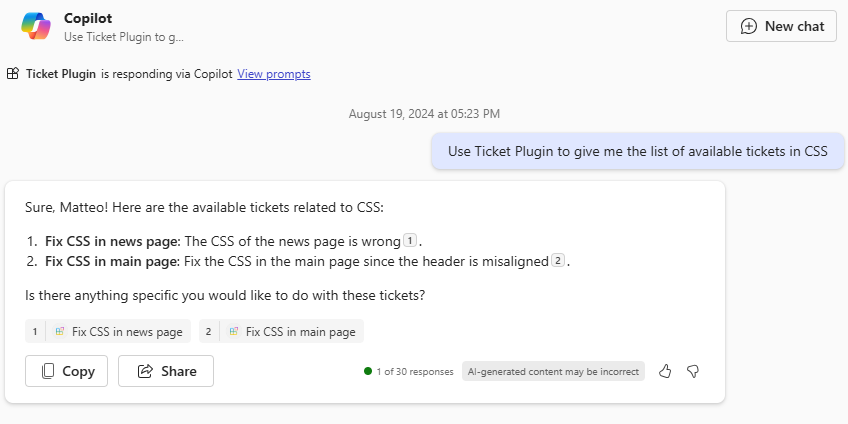
No one prevents you to have the same plugin declared both in the declarativeCopilot.json file and in the manifest.json one. It will be used by the declarative copilot, but it will be also available to be used by the standard Copilot for Microsoft 365 experience through the plugin flyout. To make it simpler to use it, Copilot now supports a new syntax based on the concept of mention. You can reference a plugin by mentioning it with the @ symbol. As you can see in the image below, the context switches to the plugin and it will be used to ground the response. In the past, instead, to make the plugin selection more effective, you needed to explicitly call it (something like Use Ticket Plugin to give me the list of tickets about CSS).
Debugging a plugin
What if something goes wrong and Copilot doesn’t return the response you’re expecting? Debugging an API plugin can be challenging because, as you have seen, unlike for Message Extension plugins, there is no code. You can’t attach a debugger and see what happens behind the scene (unless you have the chance to do that on the API side).
Luckily, you can get some help by Copilot itself, thanks to the developer mode, which has been greatly enhanced to show more details about the API calls performed by Copilot. To turn it on, just write the following prompt in the chat panel:
|
|
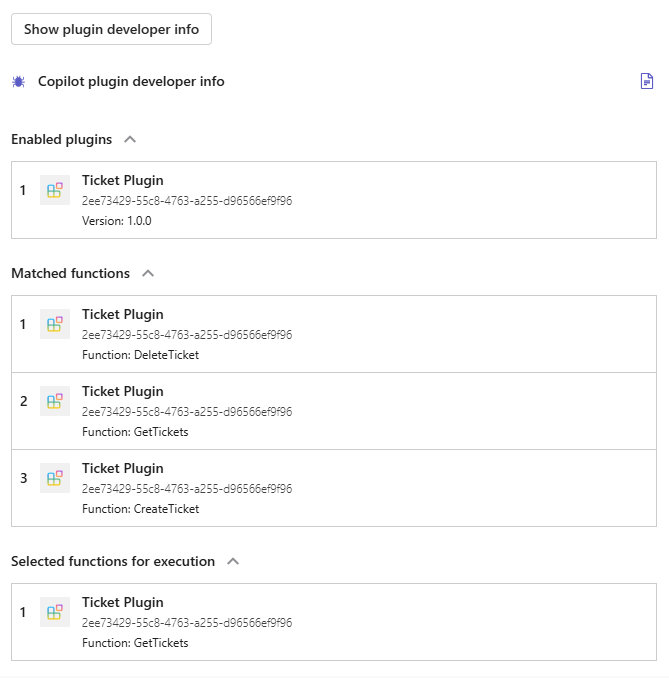
Now write a prompt that is going to trigger the plugin. Below the response, you will find many useful information. First, we can see the whole reasoning logic of Copilot. The image below shows that, when I use the prompt Give me the list of available tickets about CSS, Copilot has determined that:
- The enabled plugin is Ticket Plugin.
- The plugin exposes three functions:
DeleteTicket,GetTicketsandCreateTicket. - The function that should be called is the
GetTicketsone.
If we take a look at the execution details, we can see the full API call that Copilot performed:
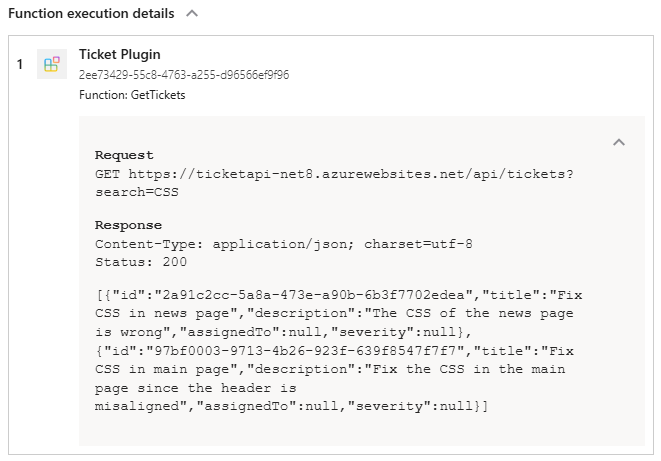
Wrapping up
In this blog post we have seen how we can create a declarative copilot using the Teams Toolkit and how we can customize it to fit our needs. We have seen all the available options we have:
- Providing a custom set of instructions
- Adding conversation starters
- Scoping the data source to a specific SharePoint site or OneDrive folder
- Enabling the use of Graph Connectors
- Embedding plugins
Thanks to declarative copilots, we can leverage the full power of the Copilot for Microsoft 36t engine, but customizing it in a way that can better fit more specialized scenarios. In this blog post, we have seen an example with an IT Copilot, but the same approach can be used for many other scenarios, like HR, finance, legal, or simply a specific project.
You can find the sample I built for this post on GitHub.
Happy coding!