
The Microsoft 365 ecosystem is, for many companies around the globe, the main productivity hub: it’s used to store documents, communicate via mails or messages, organize meetings, create internal sites. However, it’s very frequent for enterprises to have important data also outside the Microsoft 365 ecosystem: they might have public information published on their website; they might be using a solution to manage knowledge bases and tickets, like Jira or ServiceNow. Wouldn’t be nice if employees didn’t have to struggle to find the right information, but they could search across all the data sources in a single place? Even better, now that we have Copilot for Microsoft 365, if they could just chat with their data, regardless of where they’re located? This is the whole premise of Graph Connectors: they enable brining external data into the Microsoft 365 ecosystem, so that it becomes available for enterprise search and Copilot.
Take a look at this slide, taken from the Build 2024 session titled Developer’s Guide to customizing Microsoft Copilot:
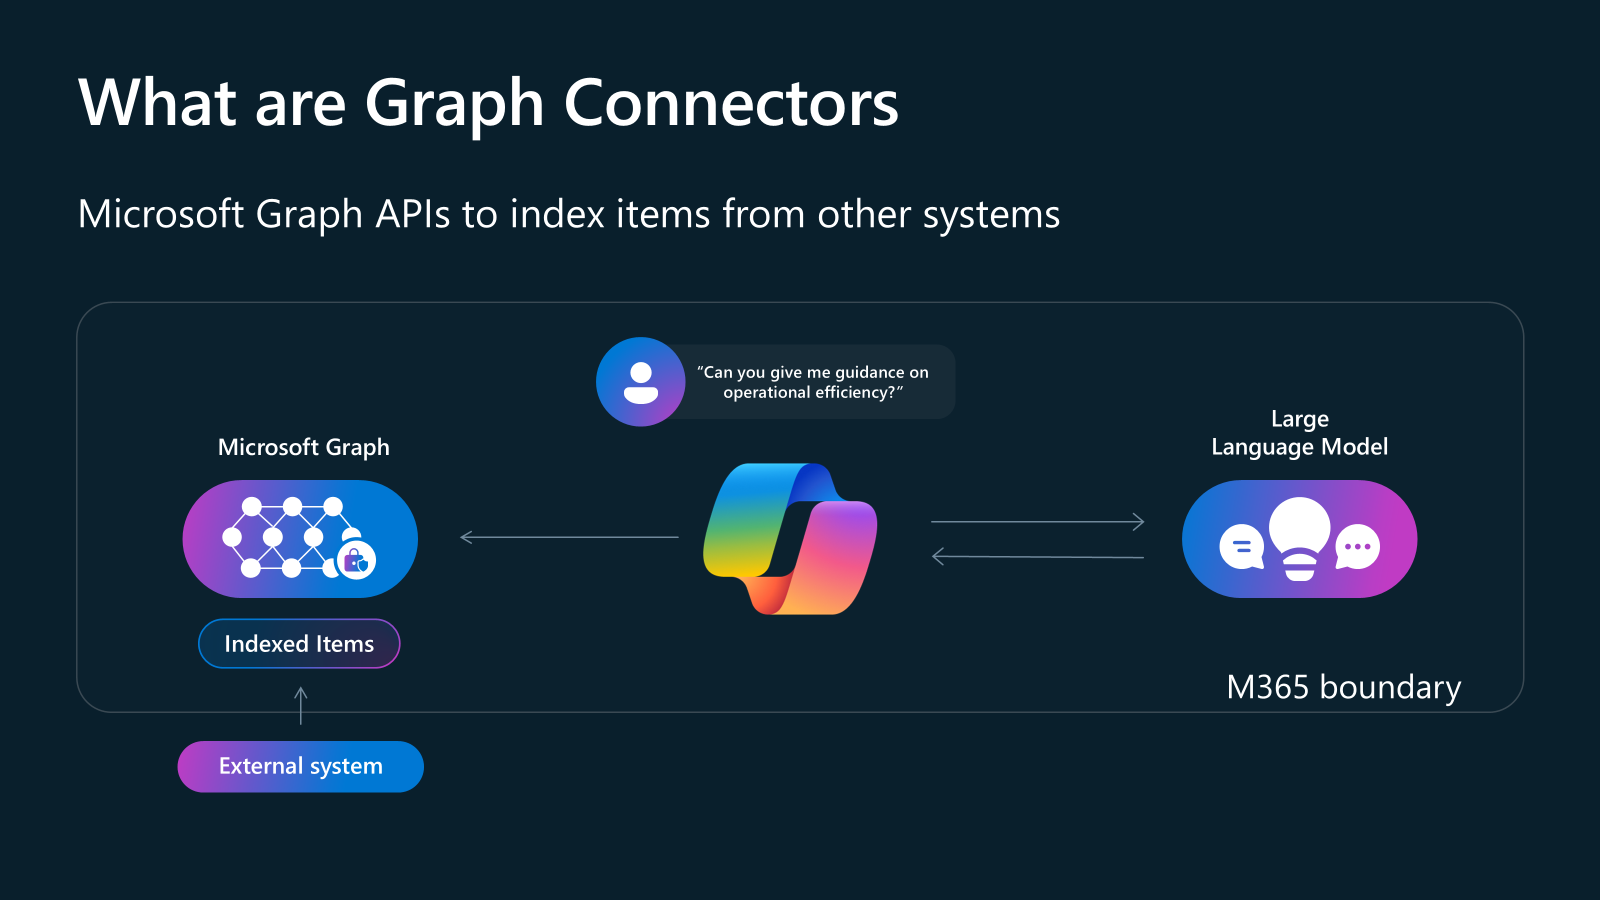
As you can see, Graph Connector actually import the external data into the Microsoft 365 tenant by using the Microsoft Graph, they don’t perform a real time query against the external data source. Once imported, for Microsoft 365 there’s no difference between a Word document stored on OneDrive or a knowledge base article that is coming from ServiceNow. As such, tools like enterprise search and Copilot will be able to leverage them like if it’s 1st party data.
This means that Graph Connectors are ideal for scenarios like knowledge bases, document libraries, etc. where data doesn’t change very often. If you’re looking to integrate real time data into Copilot for Microsoft 365, then you should take a look into plugins.
But what about permissions? When it comes to 1st party data, things are easy. Microsoft 365 has a robust permission platform based on Microsoft Entra, so you can easily control who gets access to what. If you’re searching for information about Project X and they are stored in a Word document on a SharePoint site you don’t have access to, neither the search or Copilot for Microsoft 365 will be able to surface that. When it comes to data that comes from an external source, instead, things are a bit more complicated: the 3rd party platform will likely have its own permission system, which is different than Microsoft Entra. If plugins delegate this problem to the external platform, Graph Connectors must solve it on their own since data is imported into the Microsoft 365 tenant.
In this post, we won’t completely deep dive on how to create a Graph Connector. There are already lot of amazing resources for that, like:
We will focus, instead, on how to set up the permissions even if, while doing so, we’ll also see some basic concepts around Graph Connectors in action.
Let’s start!
Setting up the project
As a starting point, we’re going to use one of the available sample projects on GitHub. The project is based on Node.js and JavaScript and, by using the Microsoft Graph, it supports ingesting into a Microsoft 365 tenant the samples published on the Microsoft 365 Sample Solution Gallery. Thanks to this connector, you’ll be able to search across the available samples, right in your tenant.
If you don’t want to mess up with the production tenant of your organization or you don’t have admin rights, you can create a new tenant for free by following the instructions in the Microsoft 365 Developer Program. This way, you can experiment with the Graph Connector without any risk. Since the content ingested by the Graph Connector is exposed across many sources, you can experiment with it even if you don’t have a Copilot license. You can just use the standard search experience in Microsoft 365.
Let’s see how to set this project up. First, make sure to clone the GitHub repository on your machine or to download the solution as a .ZIP file.
Then, open up a terminal on the samples/nodejs-javascript-solutiongallery folder of the repository and perform the following steps:
- Run the
.\setup.ps1script (or./setup.shif you’re on MacOS or Linux). The script will ask you to authenticate against your Microsoft 365 account, using the device code approach. You will need an administrator account on the tenant, since the scopes required to register the Graph Connector need admin consent. You will be asked to open a browser on the URL https://microsoft.com/devicelogin, to enter the code displayed in the terminal and then login with your account. Once you’re authenticated, the script will automatically create for you the Microsoft Entra app registration with the correct scopes, which is needed to run the application. The configuration of the application (client id, client secret, etc.) will be stored in a file called env.json - Restore the dependencies of the project by executing
npm install.
Now we’re ready to add the Graph Connector to our tenant. This process involves three steps:
- Create the connection
- Define the schema
- Upload the content
Let’s see them in more details.
Create the connection
The first step is to create the connection, which defines the basic properties of the Graph Connector, like its identifier, the public name and the description. The configuration is described using the JSON format. In the case of our sample project, you can find it inside the config.js file. You’ll see a config object with a property called connection, defined as following:
| |
The first elements are used to define the basic properties, like name and description.
The activitySettings node is used to define how to resolve the external item. Content imported from a Graph Connector, in fact, shows up in the search results but, if you try to open it, the operation will be delegated to the original platform the data belongs to. The urlToItemResolvers collection includes the instructions on how to generate the URL of the Sample Solution Gallery website starting from the id of the sample.
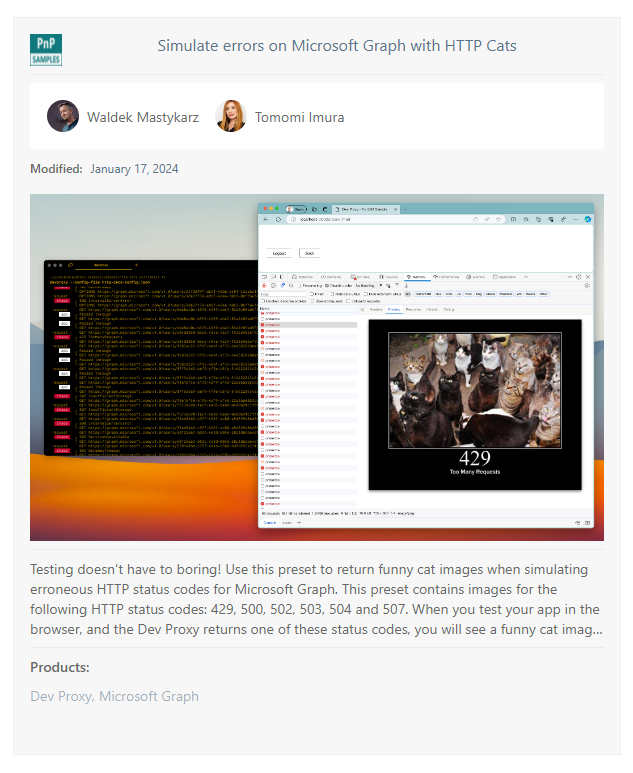
The searchSettings node, instead, is used to define how results will be displayed in the Microsoft 365 portal. The layout property is empty, but when the application will be executed will actually load the content of the resultLayout.json file and use it as a layout. This file contains the definition of an Adaptive Card, which allows to greatly customize the look & feel of the result. The following image shows the output of the Adaptive Card defined in the resultLayout.json file:
Once the configuration of the connection is defined, you must supply it to the following endpoint of the Microsoft Graph using a POST request:
| |
In the sample project, this operation is performed with the help of an object defined in the graphClient.js file, which uses the credentials stored in the env.js file to create an authenticated HTTP client that can perform operations with the Microsoft Graph.
The connection is created by the createConnection() function in the createConnection.js file, as in the following snippet:
| |
This method takes care of retrieving the configuration of the connection from the config.js file we have previously seen and then, using the authenticated HTTP client, of performing a POST operation against the correct endpoint, passing the configuration and the layout of the Adaptive Card that will be used to render the results.
Creating the schema
The second step is to define how an external item is defined. In the sample project, this is done, again, in the config.js file, inside the schema property. Here is a short snippet as an example:
| |
Basically, we’re describing the properties of each item of our data source. In our case, every sample published in the Sample Solution Gallery has a title, a description, a list of authors, an image, etc. For each property, the schema describes the name, the type, if it’s searchable, etc.
In a similar way with the connection, the schema is supplied by calling another endpoint of the Microsoft Graph:
| |
The difference is that, this time, the HTTP operation to perform is PATCH, instead of POST. Additionally, you can notice how the URL contains a placeholder, {id}, which must be replaced with the identifier of the connection you have previously created. In our sample, it would be samplesolutiongallery, as declared in the id property of the connection object.
Also for this scenario, the createConnection.js file includes a function called createSchema(), which uses the authenticated HTTP client to call the Microsoft Graph endpoint passing the schema:
| |
Deploy the connector
Now that we have seen how the connection and the schema are configured, we can start to actually deploy the Graph Connector in our tenant.
In order to do that, open a terminal in the folder which contains the nodejs-javascript-solutiongallery project you have cloned and run the following command:
| |
This command will execute the two functions we have seen: createConnection() and createSchema(). The operation will take a while to be completed. The creation of the connection is almost instant, while uploading the schema will take a few minutes.
After the operation is completed, you can check that everything is fine by opening the Microsoft 365 Admin Center. Under Settings, click on Search & Intelligence, then Data sources. You should see your Graph Connector listed there:

Under the Required actions column you will find a link labelled Include in results. This will enable the content imported by the Graph Connector to be included in search results and in Copilot responses.
However, at the moment, we haven’t imported any content, we have just configured the connection and the schema. You’ll notice, in fact, that the number of indexed items is 0. Let’s see how the content is imported, which is the key of this article, since it’s also where you’re going to define permissions.
Upload the content
The logic for uploading the content is, potentially, the most complex one, since it needs to take into account many factors. For example, a good crawl engine shouldn’t try to upload all the content each time, but only what’s changed. We won’t dig into the complexity of this implementation into this post, but we’ll focus on the content upload. The sample project itself uses a simplified approach: when a sync is performed, it stores the last sync date and time into a text file called latestChange.txt. Then, every time you trigger a new sync, it will check if the gallery has any sample that was published after this date and, if yes, it’s going to push it into the tenant.
This operation is performed by the loadContent.js file, which contains the definition of 3 key functions:
extract(), which uses an API to retrieve the list of the samples from the Sample Solution Gallery in JSON format.transform(), which takes the samples in JSON format and turns them intoexternalItemobjects, which is the type used by the Microsoft Graph to map content imported by a Graph Connector. This method takes all the properties returned by the API and converts them into the properties that we have declared in the schema.pushItem(), which actually uploads the items into the tenant. This operation is similar to the one we have seen to create the connection and the schema, since it uses the authenticated client to perform a HTTP operation against the Microsoft Graph. The endpoint used for this scenario is the following one:1https://graph.microsoft.com/v1.0/external/connections/{id}/items/{itemId}In this case, we have two placeholders: the first one is the identifier of the connection (in our case, it would be
samplesolutiongallery); the second one is the identifier of the item we’re uploading (in our case, it’s the slug of the sample that it’s used in the URL. For example, the identifier of the following sample https://adoption.microsoft.com/sample-solution-gallery/sample/pnp-devproxy-northwinddb/ would bepnp-devproxy-northwinddb).The operation to perform uses the PUT verb of the HTTP protocol.
Let’s focus on the second function, transform():
| |
The method is fairly simple: it takes the samples collection as input (which is the JSON data downloaded from the API) and then, for each item, it transforms it into an externalItem object, by setting the value of the various properties we have defined in the schema (title, description, authors, etc.).
The most interesting part for the purpose of this post is the acl property, which is the one used to define the permissions. The default value in the sample project is the following one:
| |
This is the most permissive approach: everyone in the tenant will get access to this item.
If you want to test this behavior, you just need to open again a terminal on the sample folder and run the following command:
| |
This command will execute the various functions we have just seen and that are declared in the loadContent.js file, which will actually upload the content from the Samples Solution Gallery into our tenant.
The command will have two outcomes:
In the Admin Center, you will see that the number of indexed items won’t be 0 anymore:

You’ll be able to search for content published on the Sample Solution Gallery in your tenant. For example, go to Office.com and, using the search bar at the top, search for the keyword
http cats. You will see a result coming from the connector, which uses the layout of the Adaptive Card included in the project: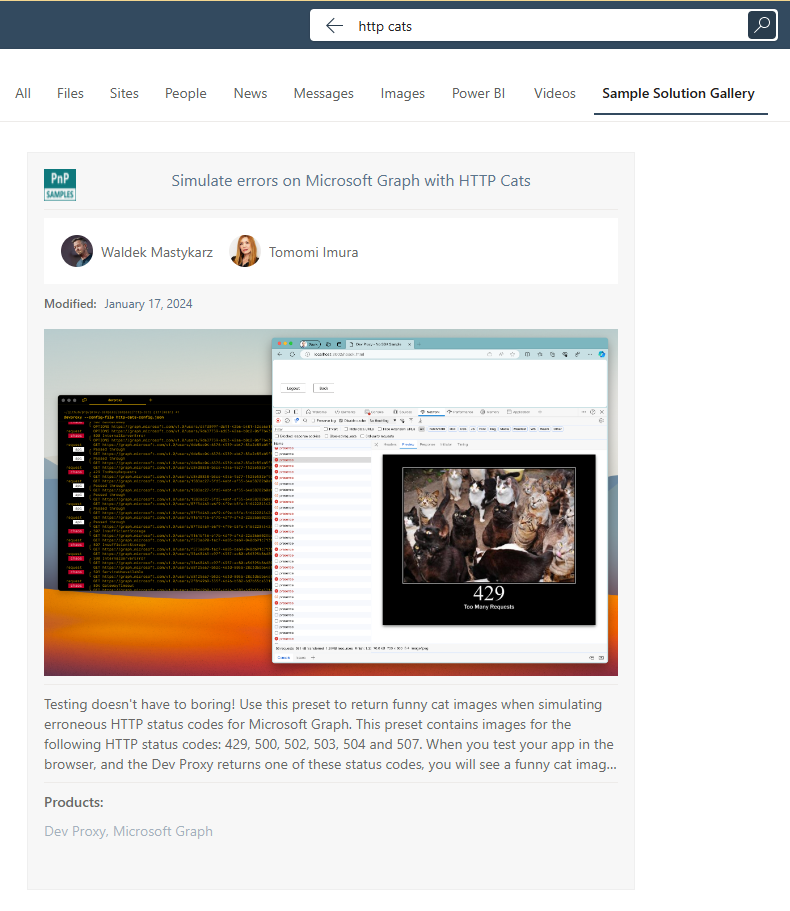
Be aware that, even if the command doesn’t take a long time to complete, the content might take a while to be available (even a few hours). So don’t be surprised if you won’t be able to find any result, just wait a bit and try again!
Now that the content is available in our tenant, we can experiment with the different ways to control permissions.
Controlling permissions at user level
The simplest approach is to define the users who can access the content at personal level. Let’s take a look at the following setup for the acl property:
| |
The three key properties are:
type, which isUseridentitySource, which is the source of the user, in our caseazureActiveDirectoryvalue, which is the GUID that identifies the user in Microsoft Entra. To get it, you must go to the Azure portal, head to the Microsoft Entra section and select Users: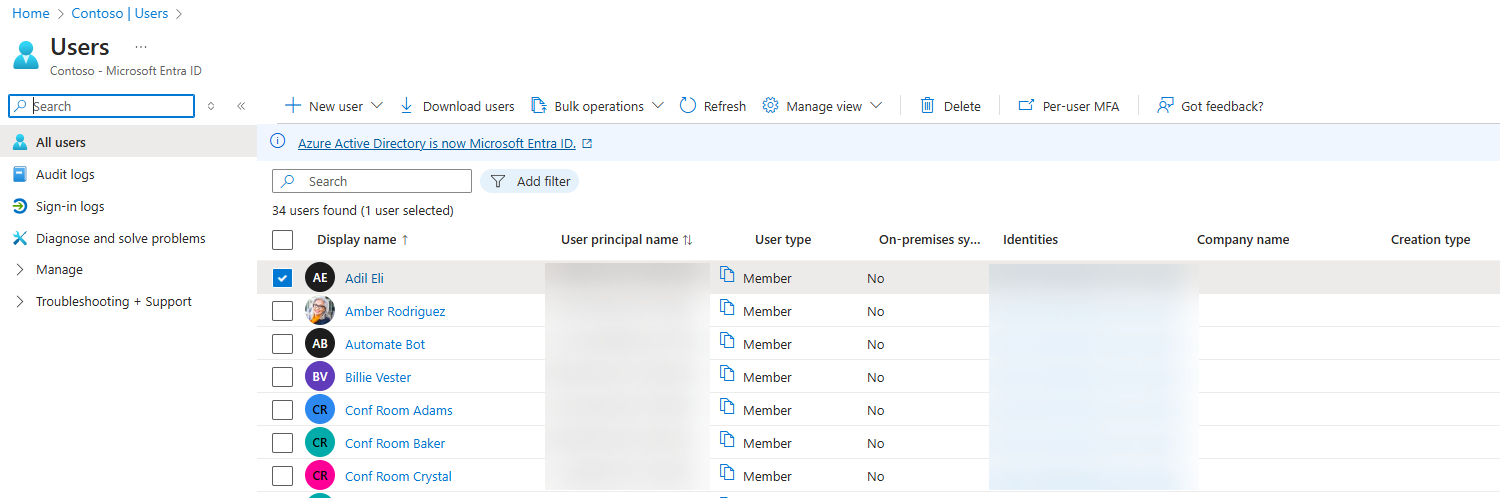
Then, click on the user you are interested to and, in the detail page, you’ll find the unique identifier, under the Object ID section:
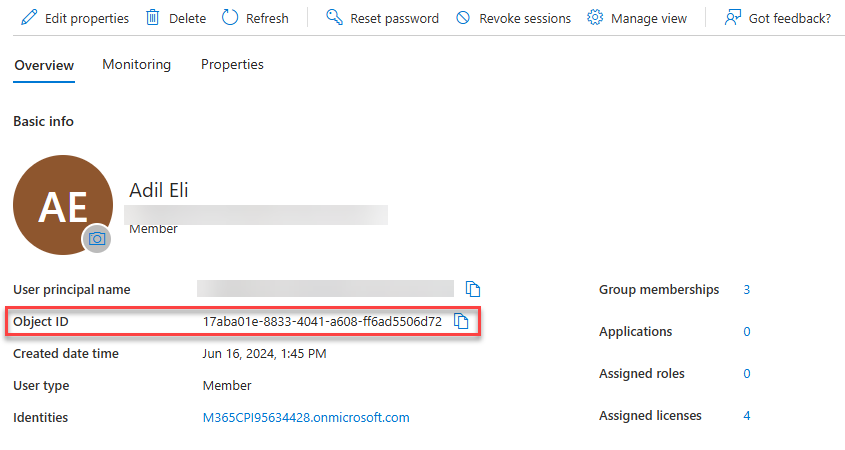
When you use the grant value for the accessType property, like in this case, it means that everyone in the tenant won’t be able to see this content, except for the ones listed in the acl property. If you want to set it up the other way around, you can use instead the deny value. Let’s consider the following acl:
| |
In this case, every user will be able to see the content, except for the one you have specified in the property.
If you want to test the feature in action, just change the acl property in the loadContent.js file like in the previous snippet, just remember to set as value the id of a real user in your tenant.
Then delete the latestChange.txt file (otherwise the application won’t find any new item and it won’t trigger the sync) and then run again the npm run loadContent command.
Once the operation is completed, try to repeat the search for the http cats keyword. You should be able to observe that only the user you have added in the acl property will be able to find the sample from the Sample Solution Gallery. Every other user will get the message We couldn’t find any results for http cats.

Also in this case, the tenant might take a while to update the permissions, so you might need to wait a few hours before seeing the behavior changing.
Using a Microsoft 365 Dev tenant is really helpful in this scenario, since you can easily login with different users and test the behavior.
Controlling permissions at group level
In most of the cases, setting the permissions one by one for each user isn’t very effective. As such, you can use the acl property also to grant or deny access to a Microsoft Entra group, as in the following example:
| |
The configuration is very similar, except that the type property must be set to Group. Also in this case, as value, we must supply the Object ID from Microsoft Entra of the group. To find it, you can follow the same approach we used for the user, but this time, in the Azure portal, you need to choose Groups instead of Users under Microsoft Entra -> Manage.
Controlling permissions using external groups
All the previous scenarios work well when your external data source has a permission model that matches your Microsoft Entra organization. However, it’s very frequent that the data source is actually using their own permission model. For example, if you are using ServiceNow to manage tickets and knowledge bases, the permissions will be regulated by the account that employees have on the ServiceNow platform.
To manage this scenario, the Microsoft Graph supports the option to create external groups, which are special groups that exists only in the context of the connector. Inside an external group, you can add one or more Microsoft Entra users or groups. Thanks to this feature, you can define your own logic to keep the users from the external platform in sync with the users in Microsoft Entra. For example, let’s say you’re using the same group names across both platforms. You could build a sync solution that enables the following flow:
- You create multiple external groups in the connector, one for each group you’re using in the external platform. For example, if you have a HR group in ServiceNow, you create an external group called HR for the Graph Connector.
- For every user in the external group, you use the alias to find the matching user in Microsoft Entra.
- You add the user to the proper external group.
Thanks to this approach, you are able to maintain in sync the permissions between the external platform and the Microsoft Entra organization.
Let’s see the steps to follow this approach. To perform them, we’ll need to call a series of Microsoft Graph APIs which, however, aren’t part of the sample project we have used so far. If you don’t want to add the code on your own, you can use the Graph Explorer tool. Just make sure to sign in with a work account on your tenant with Admin rights, then you’ll be able to easily call the APIs I’m going to describe in the next sections.
Graph Explorer can help you also in getting access to the right scopes. All the APIs we’re going to see, in fact, requires specific scopes to be called. You can request them by clicking on the Modify permissions button on the top right corner of the tool, after you have added the endpoint and the body of the request. Just click Consent near the permission you need and the tool will take care of the rest.
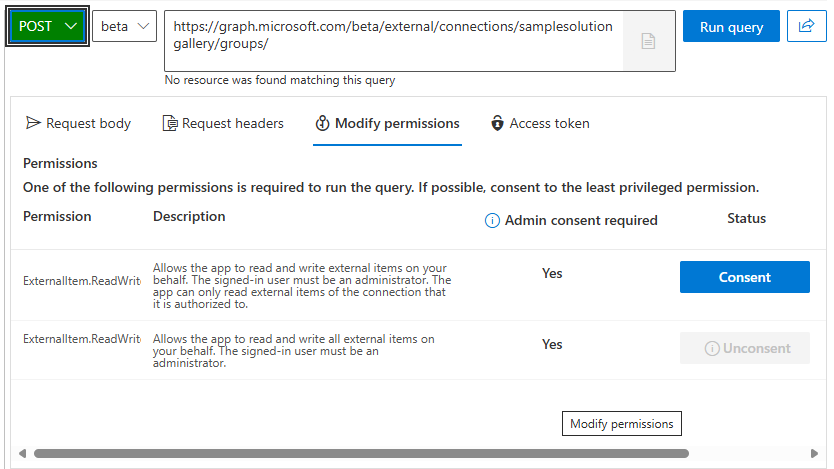
The Microsoft Graph APIs to manage external groups are still in beta, so you must use the
https://graph.microsoft.com/betaendpoint to call them.
Create the external group
The first step is to create the external group. We do this performing a HTTP POST request to the following endpoint:
| |
Using this API requires requesting access to the scope ExternalConnection.ReadWrite.All.
The connectionId is the identifier of the connection we have created at the beginning of the article. In case of our sample project, that would be samplesolutiongallery. The body of the request must contain the id, name and description of the group, as in the following:
| |
Unfortunately, this API doesn’t support listing all the external groups which are available for a specific connection. This is an information that you must track on your own, for example by storing it in a database or in a file.
Adding users or groups to an external group
The next step is to add users or groups to the external group. This operation is performed by calling the following endpoint:
| |
In this case, we have two placeholders:
connectionId, which is the identifier of the connection (again, in our sample project it’ssamplesolutiongallery).groupId, which is the identifier of the group we have created in the previous step, so in the example above it would becontoso.
To call this API, you’ll need to request the ExternalItem.ReadWrite.All scope.
The API supports both to add single users or, in case you already have a group in Microsoft Entra that matches the group in the external platform, you can add the group itself.
Regardless of the choice, we must supply as body of the POST request a JSON payload with the Object Id of the Microsoft Entra user or group and, as identitySource, the value azureActiveDirectory. What changes is the value of the type property, which could be either user or group.
| |
Also in this case, unfortunately, the API doesn’t support returning a list of the users or groups assigned to an external group, so it’s up to you to store this information. However, if you’re building a solution (like a service) to keep in sync users across Microsoft Entra and the external platform, you can easily keep track of this information.
To properly build a sync service, you’ll probably need also a way to remove users or groups, in case for example one of the employees leaves the company. In this case, you’ll need to use the same endpoint as before but:
- With the DELETE verb
- With the id of the user or group you want to remove in the URL
For example, if you want to delete the user with the id 25f143de-be82-4afb-8a57-e032b9315752 from the group with the id contoso, you’ll need to perform a HTTP DELETE request against the following endpoint:
| |
You’ll get back a 204 status code without any content, if the operation is successful.
Setting up the acl property
Once you have created the external group and added one or more user or group to it, it’s time to configure the external items you import using the Graph Connector in the right way. Again, we’re going to change the value of the acl property:
| |
We’re using, again, Group as type. However, this time we set:
- As
identitySource, the valueExternal - As
value, the name of the group we have created in the previous steps.
That’s it! If you force a sync of the content with the command npm run loadContent, you should be able to see that only the users you have added to the group Contoso will be able to find the samples from the Sample Solution Gallery.
Just remember that permissions might need some time to propagate, so you might have to wait a bit to see the changes.
Wrapping up
In this post, we have explored how to manage permissions for data that lives outside the Microsoft 365 ecosystem, but that you want to import into your tenant using a Graph Connector. We have seen how to set up the connection, how to define the schema and how to upload the content. We have also seen how to control permissions at user level, at group level and how to use external groups to manage permissions when the external platform has its own permission model.
Remember that you can find the sample project use in this blog on GitHub.