
Note: The original version of this post covered only stdio and SSE as transport protocols from MCP. Enrico Sabbadin made me aware on LinkedIn that, in the latest MCP specs, SSE has been marked as deprecated and replaced with Streamable HTTP. However, since Streamable HTTP supports backward compatibility with SSE, the MCP SDK for C# offers both transport protocols with a single implementation. The post has been updated to reflect this change. Thanks Enrico!
When you’re infusing AI in your solutions and applications, one of the the most common requirements is to connect it with your data and services. Generative AI is great at creating new text, but it doesn’t have the capability to do a research on stock market fluctuations of the last 2 weeks; or to create a ticket in your organizational’s ticketing platform. This is why, shortly after the advent of LLMs, the industry has introduced concepts like Retrieval Augment Generation (to expand the knowledge of the LLM) and tools, which are functions that the LLM can call to interact with other services and platform, like calling an API or updating a record in a database. In this blog, we have seen for example how you can use an orchestrator like Semantic Kernel to augment your AI applications with plugins, which enables the LLM to run local code functions. Or, if you’re building agents with Copilot Studio, you can use Power Platform connectors
If you’re following the AI space, however, I’m pretty sure you’ve heard a lot of buzz around the Model Context Protocol (MCP, in short), introduced by Anthropic as a new way to enable agents and AI applications to interact with various platforms and services through tools. At this point, you might be wondering: “What’s new here? We already have ways to add tools and knowledge to an LLM, why should I care about MCP?”.
The key difference is that MCP is a server-side protocol, which means that the burden of implementing a plugin shifts from the developer of the AI application to the owner of the service. This is very similar to building a traditional application that needs to connect to other systems via an API: the developer of the application doesn’t need to worry about how the API is implemented, but just needs to know how to call it and what data it returns. This is exactly what MCP does for LLMs: it abstracts the complexity of calling tools, exposing them in a way which is simple to be used by the developer and optimized for the LLM consumption, unlike a traditional REST API, which is built for general purpose scenarios.
Another difference is that MCP is a standardized protocol, based on JSON-RPC 2.0. This means that, as a developer, you don’t really need to know how the tool is implemented, which are the input parameters, what’s the output you get. Once the MCP server is up & running, a client can automatically see and use all of the available tools.
Many companies are already starting to integrate MCP as a way to expose their services to LLM. For example, GitHub offers a MCP implementation which allows to feed an LLM with information about repositories, issues, pull requests, etc. Or the Azure team recently released an MCP implementation that you can use to integrate your LLM with capabilities like managing Azure Storage accounts, Azure Cosmos DB, etc.
Also on the client side, many companies are starting to integrate MCP support in their AI products. For example, Microsoft recently released in GA a new capability for GitHub Copilot in Visual Studio Code called Agent mode, which transforms Copilot from a passive code suggestion tool into an active, autonomous coding assistant. It can plan, execute, and iterate on complex development tasks with minimal user input. As part of this release, Microsoft has also introduced MCP support, enabling the agent in GitHub Copilot to integrate tools exposed via MCP. This empowers your agent, for example, to query information from your Azure subscription, or to analyze issues in your GitHub repositories.
In this series of posts, we’re going to explore how to use MCP to enrich our agents. We’ll build a simple MCP server in .NET that exposes a set of tools, and then we’ll see how to use it in a custom agent, both with a pro code (with Semantic Kernel) and a low code (with Copilot Studio) approach.
Creating our first MCP server - The main building blocks
Before creating our first server, we first need to understand a bit more how MCP works. The communication between the client and the server is handled by a transport layer, which can be implemented in multiple ways. In our series we’ll explore the two most common approaches:
- Standard Input / Output (stdio), which means that MCP will use the standard input and output streams offered by the operating system to communicate. In this scenario, both the server and the client are running locally. This approach is used by many vendors, who publish their MCP server implementation as a package (for NuGet, Node or Python) or as a Docker image, which is then consumed by the client application. This is the implementation we’re going to take a look at in this post. When you use this approach, in fact, the server isn’t a real server that needs to be always up & running, but rather an executable that is run by the client application whenever it needs to call a tool. This is the approach we’ll explore in this post.
- Streamable HTTP, which is based on HTTP and GET / POST requests to exchange messages between the client and the server. In this scenario, the server is running on a remote machine and the client is running locally. This approach was originally implemented using Server-Sent Events (SSE), which is now deprecated but it’s backward compatible with Streamable HTTP. This means that, from a tooling perspective, you can build MCP server that can support both HTTP Streaming and SSE. This is important because Copilot Studio uses SSE to consume the tools exposed by the MCP server. This approach follows a more traditional client-server model, where the server must always be running to listen for incoming client connections. This is the approach we’ll explore in the next posts.
Let’s start to create our server with the stdio approach. As mentioned, we don’t need a real server, an executable is just fine. For our own purposes, we’re going to create a simple .NET console application. In our scenario, we’re going to simulate a service that the organization can use to track leave requests from employees. This service will enable employees to:
- Find out how many leave days they have left
- Request a leave day
- Get the list of all the employees and their leave days left
The service implementation
Let’s start to go over the main service of our project. We won’t spend too much time in this section, since it’s mainly boilerplate code needed to handle vacation day requests. For our sample, I’m going to use Azure Table (part of Azure Storage) to store the leave requests. The main reason of this choice is that Visual Studio Code can be easily integrated with Azurite, which is a local Azure Storage emulator. This way, you’ll be able to run the code locally without needing any Azure subscription, and with a much more minimal setup compared to what you would need to use a proper database like SQL Server.
The starting point is to install the Azurite emulator in Visual Studio Code. You can do this by searching for Azurite in the extensions marketplace or by opening the following page in the browser and clicking on Install. After the extension is installed, you should see the following options in the lower command bar of Visual Studio Code:

By clicking on one of these options, you’re going to start the local emulator for the various components of Azure Storage: Table, Queue and Blob. For the moment, we can move forward, since we won’t need the emulator right away. Now we can start writing our code, by creating a new console application based on .NET 9.0. You can do this in Visual Studio, Visual Studio Code or by running the following command in a terminal:
|
|
Now we need some code to store the information about employees and their leave requests. First, we need to add the Azure.Data.Tables NuGet package to our project. If you’re using Visual Studio, you can right click on the project in the Solution Explorer and select Manage NuGet Packages. In the Browse tab, search for Azure.Data.Tables and install it. If you’re using Visual Studio Code, you can run the following command in a terminal:
|
|
Now let’s add a folder to our project by right clicking on it and choosing New folder. Let’s call it Entities. Then, inside this new folder, add a new class called EmployeeVacationEntity.cs. This class will be used to store the information about the leave requests. Copy and paste the following code in the file:
|
|
We only need to store two information: the name of the employee (we’re going to reuse the RowKey property for this) and the number of vacation days left. All the other properties you see (like PartitionKey and RowKey) are required by the Azure Table SDK, and they are used to identify the entity in the table.
For the purpose of our MCP implementation, however, we need also a simpler entity to track employees and their vacation days. When we need to return the data to the caller, in fact, we don’t need to return things like PartitionKey or ETag, which are part of the internal Azure Table SDK implementation and might just confuse the LLM.
As such, let’s create a new class in the new folder called Employee.cs and copy and paste the following code in the file:
|
|
Now we can start to implement the actual service which will provide the methods to interact with the Azure Table service and perform the operations we need for our scenario. Create a new folder called Services and add a new class called EmployeeVacationService.cs. Here is the full code:
|
|
As mentioned, I won’t cover in details everything that this class does, since it’s mostly boilerplate code to read and write data from the Azure Table service. The class uses the Azure Table SDK to perform the following operations against the database:
GetVacationDaysLeftAsync(): retrieves the number of vacation days left for a specific employee.ChargeVacationDaysAsync(): charges a number of vacation days to a specific employee.IsTableEmptyAsync(): checks if the table is empty.SeedFakeEmployeesAsync(): creates a set of fake employees with random vacation days left. This method is used at the project startup to populate the table with some data that we can use for testing.GetAllEmployeesAsync(): retrieves all the employees in the table.
Now we need to initialize the console application, by setting up the dependency injection system and by registering the service we have just created in the Program.cs file:
|
|
By default, unlike an ASP.NET app, a console app doesn’t have any initialization code to manage dependencies, logging, configuration, etc. As such, we must manually create a builder using the Host class, which is the main entry point for a .NET application, by calling Host.CreateEmptyApplicationBuilder().
Once we have a builder, we must load the configuration from the appsettings.json file, which is where we will store the connection string to the Azure Table service.
Then we can register the EmployeeVacationService in the dependency injection container as a singleton, since we want to use a shared instance across the application. We won’t let the dependency injection container create a new instance of the service automatically, but we’re going to supply a specific one created by ourselves, so that we can pass the two parameters required by the constructor: the connection string (loaded from the configuration file) and the table name (which is hardcoded in this case, it’s called VacationsTable).
Now that we’ve finished configuring the application, we can create it by calling builder.Build(). Before executing it, however, we need to seed some test data we could use to test our application. We do this with the following block of code:
|
|
This code creates a new scope, which is a way to create a new instance of the service with its own lifetime. This is useful when we want to create a new instance of the service that is not shared with the rest of the application. Inside the scope, we retrieve the instance of the EmployeeVacationService we have previously registered and we use the IsTableEmptyAsync() method to check if the table is empty. This way, we avoid populating the table with test data every time the application starts, but only the first time we execute it. If that’s the case, we call another method, SeedFakeEmployeesAsync(), to populate the table with some fake data.
Finally, we can run the application by calling await app.RunAsync(). This will start the console application and wait for incoming requests.
The last step is to add the connection string for Azure Table to the appsettings.json file. Create a new file in the root of the project called appsettings.json and copy and paste the following content in it:
|
|
The connection string is set to UseDevelopmentStorage=true;, which means that the application will use the Azurite emulator running locally. This is the default connection string for Azurite, so you don’t need to change anything. If you want to publish this project in the cloud and use a real Azure Storage account, you can replace this value with the proper connection string.
So far, all the code we have seen is only about setting up the proper infrastructure we need to manager our “Leave requests” scenario. Now it’s time to start adding the specific MCP code to expose the service we have just created.
Setting up the MCP server
To set up the MCP server, first we need to add the MCP SDK for C# to our project. The package is published as pre-release, which means that:
-
If you’re using Visual Studio, you need to check the Include pre-release checkbox in the NuGet package manager and then search for the package called
ModelContextProtocol. -
If you’re using Visual Studio Code, you can run the following command in a terminal:
1dotnet add package ModelContextProtocol --prerelease
Now we need to create a class to expose all the methods of our EmployeeVacationService as MCP tools. Create a new class in the project, call it EmployeeVacationTool.cs and copy and paste the following code in it:
|
|
In the constructor, we’re injecting the EmployeeVacationService instance we created before, so that the .NET dependency injection system will take care of creating the instance for us. The first important step is to decorate the class with the [McpServerToolType] attribute. This tells the MCP SDK that this class contains tools that we want to expose to the client. MCP supports other type of attributes: for example, a MCP server could expose prompts (using the [McpServerPromptType] attribute).
Then, we just need to write a bunch of methods that are actually wrappers around the ones we have already created in the EmployeeVacationService class. They will get, as input, the same parameters we have in the original methods, and they will return the same type of data. The only difference is that we need to add the [McpServerTool] attribute to each method we want to expose. This tells the SDK that this method is a tool that can be called by the client. Additionally, very importantly, for each method and parameter we must add a description using the [Description] attribute. This is critical and what makes MCP really tailored for LLM usage: thanks to these descriptions, we can help the LLM to understand what the tool does, how to use it and if it’s the right choice for the task at hand. Without using MCP, the responsibility of understanding how to use a tool is on the developer. For example, if you’re using Semantic Kernel as orchestrator, you need to provide a description of the function you’re calling and the parameters as part of the plugin code.
Now that we have defined the tools, we need to initialize the MCP server. With the help of C# SDK, the task is really easy. We just need to add a few initialization lines in the Program.cs file. We must add the following block before the app is built:
|
|
We’re calling, in order:
AddMcpServer(): this method adds the MCP server to the dependency injection container.WithStdioServerTransport(): this method configures the server to use the standard input/output transport. This is the transport we’ll use in this post.WithToolsFromAssembly(): this method scans the assembly for any classes decorated with the[McpServerToolType]attribute and registers them as tools in the MCP server. This is how the server knows which tools to expose to the client.
If we want to be more specific (for example, you have added some testing tools that you don’t want to expose), we can replace WithToolsFromAssembly() with WithTools<T>(), where T is the type of the class that contains the tools we want to expose. In our case, we can use WithTools<EmployeeVacationTool>() to expose only the EmployeeVacationTool class:
|
|
That’s it. Now the MCP server is ready to be used. As we mentioned in the beginning of the post, the server is not a real server that needs to be always up & running, but rather an executable that is run by the client application whenever it needs to call a tool. This means that we don’t need to run the server in a separate process or listen for incoming requests. We just need to call it from the client.
Testing the MCP server
Now we’re ready to test the MCP server we’ve build and, guess what, we don’t really need to write a client application! At the beginning of the post, in fact, I mentioned many applications have been updated to add MCP support, including GitHub Copilot and Visual Studio Code. As such, all you need is to open Visual Studio Code and make sure that Agent mode is enabled for GitHub Copilot:
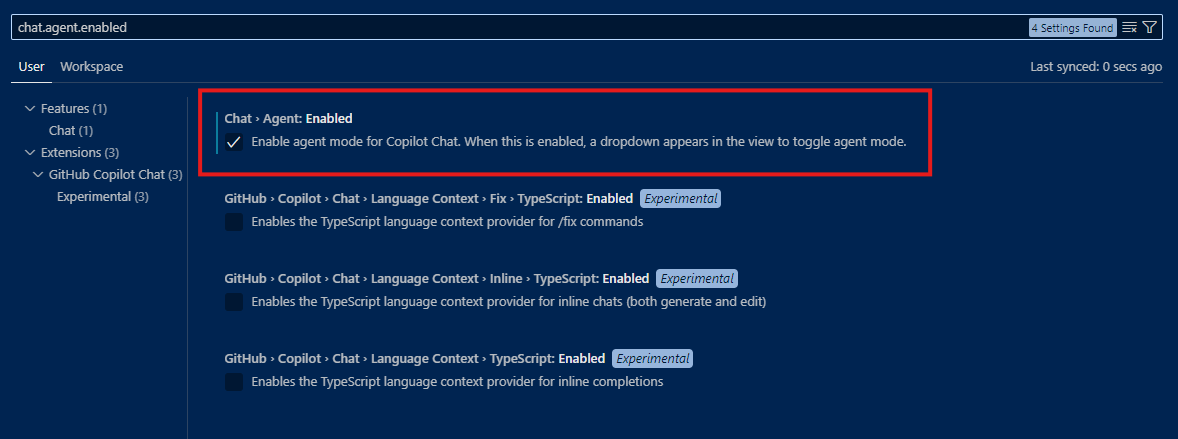
You can click the following link to automatically open Visual Studio Code on the right setting and turn it on.
Before setting up the MCP server, however, we need to start the Azurite Table Service emulator, otherwise our MCP server will fail to start because it won’t be able to connect to the Azure Table service. To do this, you can:
- Click on the [Azurite Table Service] option in the application bar of Visual Studio Code.
- Press Ctrl+Shift+P to open the command palette and look for the command Azurite: Start Table Service.
Now that everything is up and running, the easiest option to configure it is to add a new folder to your project called .vscode and, inside it, create a new file called mcp.json. Inside it, copy and paste the following content:
|
|
Make sure to replace the last parameter of the args array with the path of your project. This file tells to GitHub Copilot where to find the MCP server and how to run it. As you can see, we don’t even have to build the tool and point the configuration to the executable, but we can just run the project directly using the dotnet CLI. Behind the scenes, Visual Studio Code is going to run the project with the command:
|
|
The key parameter that makes this possible is type, which we set to stdio to use standard input/output as transport.
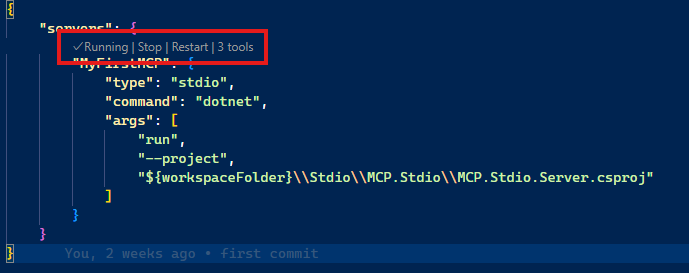
Once you’ve added this file, Visual Studio Code should recognize it as the configuration for an MCP server and should give you the option to start it. If everything goes well, you should be able to see the number of tools exposed by the server:
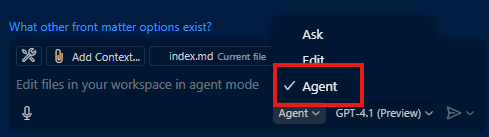
Now open GitHub Copilot, by clicking on its icon at the top, near the search bar. In the textarea where you can write the prompt, click on the dropdown menu which is set to Ask. You should see an option called Agent. Make sure to select it.
When you’re in agent mode, you should see in the toolbar a toolbox icon, with the number of tools that are exposed by the MCP server. If you click on it, you should see that GitHub Copilot has properly recognized the three tools we have exposed in the MCP server:

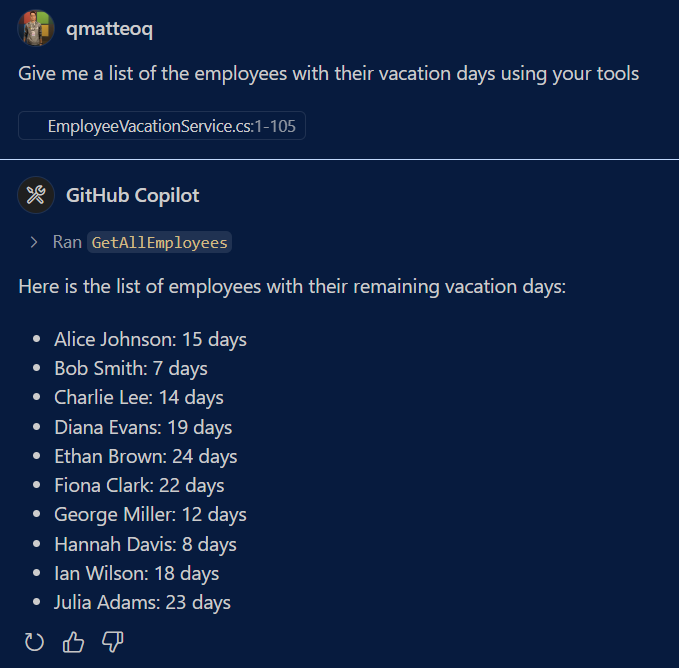
Now let’s write a prompt that will require the usage of a tool to be solved. For example, we can ask:
|
|
GitHub Copilot will ask the permission to call one of the available tools, in this case the one called GetAllEmployees. If you expand the panel, you can see also the input parameters that will be submitted to the tool (in this case, it will be empty since it doesn’t require any input).
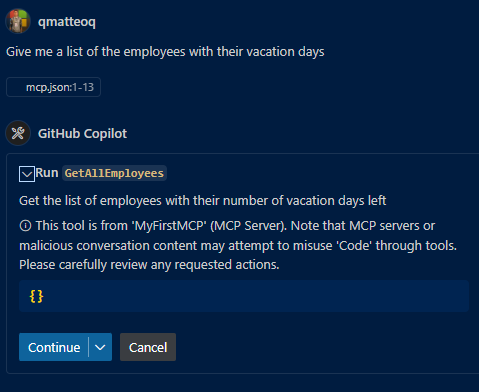
If you hit Continue, GitHub Copilot will run the tool, get the results back and process it to give you a response:
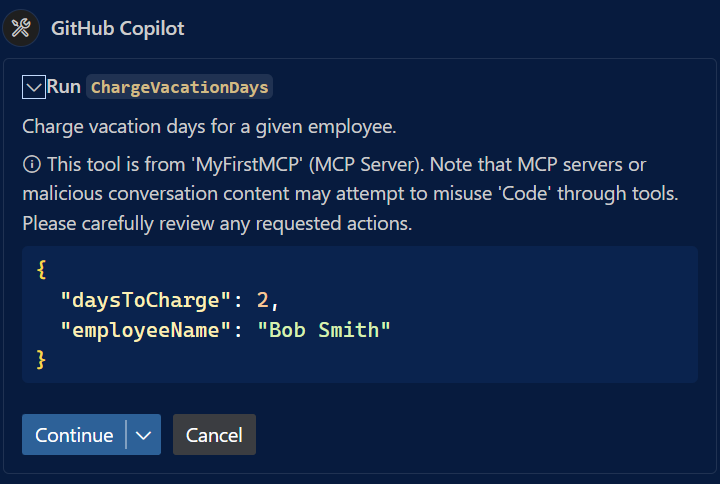
If you want to test the ability of the LLM to extract input parameters from the prompt, you can try to use a prompt like this:
|
|
GitHub Copilot will ask your permission again to call the MCP server, in this case the tool called ChargeVacationDays. This time, if you expand the panel, you should see that the LLM has extracted the input parameters from the prompt and it’s passing them to the tool:
Wrapping up
In this post, we have seen how to create a simple MCP server that exposes a set of tools. Thanks to our MCP server, we can enhance the LLM to interact with a fictitious platform to manage vacation days request. In this blog post, we have tested the MCP server with GitHub Copilot, which was an interesting experiment, but not really practical. In the next posts, we’ll see how we can use the same tools in different custom agents, built with pro code and low code approaches.
You can find the final code of the project in the GitHub repository. Specifically, the implementation based on standard input/output we have built in this post is in the Stdio folder. The code is basically the same we have built in this post, you will notice a few differences since in the final version I’ve also added a bit of logging.
Happy coding!