
Update on 31st July 2024
The workaround of installing the cross-env library to use Graph Connectors with Dev Proxy in a cross-platform way isn’t needed anymore. The latest version of the project (create-graph-connector 0.1.3) uses env-cmd to solve this problem. As such, that part has been removed from the original version of the post.
In another post on this blog we explored a few concepts around Graph Connectors: what they are, which is their value, why they are important for Copilot and, lastly, we focused on the permission model. However, we didn’t spend much time understanding how to implement a Graph Connector from scratch: we started from one of the existing samples, so we have briefly seen concepts like creating a connection, creating a schema and ingesting content, but we didn’t actually implement them. In this post, we’ll take a deeper look, instead, on how to create a Graph Connector, with the help of a new tool released by the Microsoft 365 Advocacy Team: the Graph Connector project generator.
The Graph Connector project generator
The Graph Connector project generator is a new tool developed by Waldek Mastkyarz, a Microsoft 365 Developer Advocate who you might know as one of the creators of the great DevProxy tool (we’ll talk about it a bit later in the post).
The Graph Connector project generator is a CLI tool that allows you to create a new Graph Connector project in a few seconds, with all the boilerplate code you need to start developing your connector. The version we’re going to use today is based on Node.js and TypeScript, so you’ll need a Node.js development environment set up on your machine.
The tool is available on npm, so you can install it with a simple command:
| |
Once installed, open a terminal and move to the folder where you want to create your Graph Connector project and run the following command:
| |
The project generator will start a wizard asking for a few information:
- The name of the project, which will be used as name of the folder as well, so make sure to avoid using spaces or weird characters.
- The Graph Connector name that will be displayed in Admin Center.
- The Graph Connector description.
- The connection id. It’s a string between 3 and 32 chars, used to identify the connection. You can’t use spaces and you should avoid using weird characters.
- The template you want to use. For the purpose of this post, we’re going to use TypeScript (Basic)
At the end, you will have a Node.js project based on TypeScript, with the following structure:
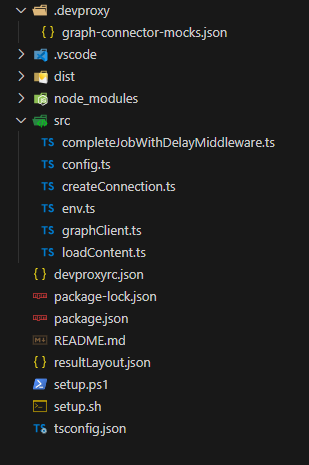
Here are the key files we’re going to work on in the rest of the project:
- src/config.ts: it contains the configuration of the connection and the schema of the data we’re going to import.
- src/createConnection.ts: it contains the functions that call the Microsoft Graph APIs to create the connection and the schema.
- src/graphClient.ts: we won’t actually need to modify this file, but it’s important to be aware of its existence. It contains the definition of a
GraphClientobject that the project uses to preform authenticated requests against the Microsoft Graph. It contains also the logic for supporting a proxy (which is needed if you want to use the DevProxy tool) and to manage the delay between the API call and the response returned by the Microsoft Graph. - src/loadContent.ts: it contains the functions that calls the Microsoft Graph APIs to ingest the external content into the Microsoft 365 tenant.
- resultLayout.json: it contains the definition of the Adaptive Card that will be used to display the results of the connector.
My advice is to use Visual Studio Code to work on the project, as it has a great support for TypeScript and Node.js projects, and it will help you a lot in understanding the code and in debugging it.
For the purpose of this post, we’re going to create a Graph Connector that connects to RSS feed of my blog, so that all the posts I’ve published are ingested into the Microsoft 365 tenant. We’re going to use the RSS feed of this blog as the source of the data.
Let’s start!
Defining the connection and the schema.
The first step is to define the configuration of the connection and the schema of the data we need to ingest into the tenant. This is done inside the config.ts file. Let’s start with the connection.
The connection
To setup the connection, we don’t have to do much, since the project generator already created a basic configuration for us, using the various information we have provided in the wizard, like the connector’s identifier or the name, as you can see in the following snippet:
| |
However, there’s an important setting we need to add, which is the urlToItemResolvers property. This property is enables the platform to detect when users share URLs from your external content with each other. It’s especially important when you use Graph Connectors with Copilot, since Copilot for Microsoft 365 has a higher likelihood of displaying content that has been shared with that user. In our case, since we’re talking about ingesting posts from this blog, the hosting platform is the blog itself. As such, we need to provide a way to reconstruct the url of the original article from the identifier of the post. This is what’s done in the following snippet:
| |
If you take a look at various posts on this blog, you’ll notice that all of them follows the structure of https://www.developerscantina.com/p/slug, where slug is the identifier of the post (for example, for this post it’s graph-connectors-template). This is what we’re going to use to resolve the original item from the external content.
The schema
The second part of the config.ts file includes the definition of the schema of the data we’re going to ingest. Using JSON format, we simply describe which the properties are of our data and for which purposes they can be used by the Microsoft 365 tenant (like if it’s searchable, retrievable, etc.). The default schema in the template is a good starting point, since it include some critical properties like title, url and the urlIcon. We can add as many we need to match the structure of our external data.
You can review the meaning of all the properties in the official documentation. One of the most important ones is labels, which is used to match one of the properties of the external content with a well known Microsoft 365 property. These are called semantic labels and they greatly improved the search experience in Microsoft 365 for your data. Being Microsoft 365 properties, you will find in the list only generic ones, that are agnostic and that can be applied to almost any data source, like title, url, createdDateTime, etc.
For our scenarios, the properties included in the schema are almost good enough. We will just add a new one called description, which will include the content of the post, following the RSS structure. This is the final schema:
| |
As you can notice, description doesn’t have any semantic label, since we don’t have any Microsoft 365 property that can match it.
Deploy the connector and the schema
Creating the connection and uploading the schema is performed by the createConnection.ts file, which includes two functions for this purpose: createConnection() and createSchema(). Both of them are using the GraphClient object (defined in the graphClient.ts file) to call the Microsoft Graph APIs.
The createConnection() function creates the connection by calling the endpoint /external/connections and passing the connection definition from the config.ts file.
The createSchema() function creates the schema by calling the endpoint /external/connections/{connectionId}/schema and passing the schema definition from the config.ts file. In the case of our sample, the connectionId will be devcantina, as we have defined in the initial wizard.
From a development perspective, we don’t have to change anything in this file. The two functions are implemented, in fact, in a generic way, all the configurations are taken from the config.ts file.
Ingesting the content
Now that we have defined a connection and a schema, we are ready to actually get the list of posts published in the blog and upload them as external items in the Microsoft Graph. The logic for this is contained in the loadContent.ts file, which is also the most complex file of the solution and the one in which we’ll need to most of the changes.
Every data source is unique, with its own logic to retrieve the data. As such, this file contains the basic skeleton of the functions we need to implement, but then it’s up to us to fill the gaps with the actual logic to retrieve the data.
Let’s see them step by step.
The extract() function
This function is used to retrieve the list of items we want to ingest. For this purpose, the file includes the definition of a TypeScript interface called Document, which describes an item from our external source. The interface already contains some basic properties, but you can customize it as needed. For my purpose, I don’t need to add anything, since the interface already contains all the properties that describe a blog post:
| |
Once we have defined the interface, the goal of the extract() function is to get the list of items from your external data source and convert them into Document objects. In our case, we’re going to use the RSS feed of the blog, which is a XML file that contains all the published posts. To simplify our code, we’re going to use the xml2js library to parse the XML file and extract the information we need.
As first step, open a terminal in the folder that contains the connector and run the following command:
| |
Then, we must import the following object at the beginning of the file:
| |
Finally, we can implement the extract() method as follows:
| |
First, we have changed the signature of the method since we need to execute a few operations (like fetch()), which are asynchronous. As such, the function is marked with the async keyword and, instead of returning an array of Document objects (Document[]), it returns a Promise that will resolve to an array of Document objects (Promise<Document[]>).
Thanks to the xml2js library, it’s fairly easy to parse the XML file and extract the information we need. First we use the fetch() function to retrieve the RSS feed, we parse the response as text using the text() function and then we use the parseStringPromise() function to convert the text into a JSON object. Now we can use the JSON as a dynamic object and, for each post, create a Document object with the information we need: title, description, link and thumbnail.
The getDocId() function
The getDocId() function is used to generate a unique identifier for each item we’re going to ingest. This is important because the Microsoft Graph needs a way to uniquely identify each item, so that it can be updated or deleted if needed. Also in this case, we must provide our own logic, because each data source has its own way to identify an item.
In the beginning of the post, we have already said that, for our scenario, the id of a post is its slug. However, the RSS feed doesn’t contain this information, so we must parse the URL to retrieve this information:
| |
In input, we get the usual Document object. We use the URL object to parse the URL and then we split the pathname of the URL to get the segments. The slug is the second to last segment, so we get it and return it.
The transform() function
The transform() function is used to convert the collection of Document objects into a collection of ExternalItem objects, which is the type used by the Microsoft Graph to identify an external item. An ExternalItem has the following properties:
id, which is the unique identifier of the item.properties, which is a collection that contains all the properties of the item, as defined in the schema.content, which is a string that contains the content of the item. This is used by the Microsoft 365 search engine to index the item and make it searchable.acl, which defines the permissions of the item. This is used to define who can see the item in the search results. We won’t dive into this property, since we have already covered it in a previous post.
This method receives in input the collection of Document objects that was generated by the extract() method and returns a collection of ExternalItem objects. As such, most of the work here is adjusting the content of properties and content to match the schema we have defined.
For the purpose of my project, I didn’t have to make any change:
idis generated using thegetDocId()method we have previously implemented.- The default implementation of
propertiesalready includes the information we need to describe a post, liketitle,urlandiconUrl. contentis already set with the actual content of the post.aclis set so that everyone can access the content of the Graph Connector, which is fine for my scenario.
This is the full implementation:
| |
Putting all this together
Now that we have implemented the extract(), getDocId() and transform() methods, we can put all this together. The file contains another function, called load(), which is the one that actually loads the content into the Microsoft 365 tenant, by calling the Microsoft Graph APIs. However, we don’t need to actually make any change to this code, since the way the API is called doesn’t change based on the data source since, at this stage, we have already converted our items into ExternalItem objects.
The code contains another function that we don’t need to change: it’s called loadContent() and it simply takes care of calling all the functions we have seen before in the right order:
- It calls the
extract()function to get the list of items from the external data source. - It calls the
transform()function to convert the list ofDocumentobjects into a list ofExternalItemobjects, passing as input the outcome of theextract()function. - It calls the
load()method, passing as input the collection of transformed items, so that they can be uploaded to the Microsoft 365 tenant.
Before we actually deploy our Graph Connector, there’s one last step to do.
Setting up the Adaptive Card
If we go back to the createConnection.ts file and we take a deeper look to the createConnection() function, we can notice the following code:
| |
What it does is reading the content of the resultLayout.json file and setting it as the layout of the search result template. This is an Adaptive Card, which is used to display the results of the search in the Microsoft 365 tenant. The Adaptive Card is a JSON object that describes the layout of the card, which can include text, images, buttons and more. This is required: if we provide an invalid layout, we won’t be able to deploy the connector.
However, the default resultLayout.json file contains an empty card. This is because the layout of the card is highly dependent on the data we’re ingesting. In our case, we’re ingesting blog posts, so we can create a simple card that displays the title of the post, the content and a link to the original post. This is the layout I’ve created:
| |
It’s a very simple layout, that generates the following result:
If you want to create a more complex layout, you can use the Adaptive Card Designer, which is a web-based tool that allows you to create Adaptive Cards visually and then it gives you the corresponding JSON.
Managing the authentication
We have mentioned how the Graph Connector uses the Microsoft Graph APIs to create the connection, upload the schema and ingest the content. However, we haven’t talked about how the Graph Connector authenticates against the Microsoft Graph. This is a critical aspect, since the Microsoft Graph requires authentication to be called.
This is achieved by creating a Microsoft Entra app registration in the tenant we want to deploy the connector to. Luckily, we don’t need to do this manually, but the template includes a script that does this for us. We just need to open a terminal in the project’s folder and run the following command if you’re on Windows:
| |
or this one if you’re on macOS or Linux:
| |
The script will open up your browser, asking you to login with your work account on a Microsoft 365 tenant. Make sure to use an account with admin permissions, since the scopes required to use the Microsoft Graph APIs we need require admin approval. At the end of the process, you will find a new file in the src folder of your project, called env.js. It contains all the information about the app registration (client id, client secret, etc.), which will be used by the graphClient.ts file to create an authenticated HTTP client.
Testing the connector
Now we are ready to deploy and test the connector. As first step, we need to actually build the code. Since we’re using TypeScript, we need to “compile it” so that it can be converted into JavaScript and executed by Node.js. As such, open a terminal on the project’s folder and run the following command:
| |
Now that the code is built, we have two options:
- We deploy the connector to a Microsoft 365 tenant and we test if we are able to find results from our data source (in our case, this blog).
- We use DevProxy to simulate the Microsoft Graph API calls. This will enable us to test if the code we have written is correct, without actually needing a tenant where to deploy the connector.
DevProxy is a tool developed by Microsoft that you can use to simulate APIs. It’s very helpful when you’re developing applications that needs to connect to an API, since it allows to simulate API errors, rate limits and throttling, to mock response, etc. In case of our project, it can help us by simulating the usage of the Microsoft Graph APIs to ingest the content, allowing us to test our code without actually deploying the connector.
This option is greatly simplified by the fact that the generated project already includes two configuration files for DevProxy:
- One is called graph-connector-mocks.json and you can find it under the .devproxy folder. It contains the mocked responses for the Microsoft Graph APIs we’re going to use.
- One is called devproxyrc.json and it’s in the root of the project. It contains the configuration of DevProxy, which enables the plugin to mock the responses and it includes the list of the URLs to intercept (all the Microsoft Graph endpoints).
All you have to do is to install DevProxy (I won’t dive into this, since it’s well documented in the official documentation) and then open two terminals in the project’s folder. In the first terminal, run the following command:
| |
By launching DevProxy from the project’s folder, it will automatically pick up the mock file and the configuration file and start intercepting requests against the Microsoft Graph.
In the second terminal, instead, run the following command:
| |
This script will execute the createConnection.ts file, which is going to call the createConnection() and createSchema() functions. However, since we have passed the proxy parameter, the graphClient.ts file will set up the URL http://127.0.0.1:8888 as proxy, which means that all the requests will be sent to DevProxy instead to the real Microsoft Graph endpoints.
You’re going to observe something similar:

In a similar way, you can test the content ingestion by running the following command on the second terminal:
| |
This will call the loadContent() function in the loadContent.ts file, which starts the process of downloading the RSS feed of the blog, turning the items into ExternalItem objects and uploading them to the Microsoft 365 tenant.
And what if you want to actually test the code for real and actually deploy the connector? Simply call the scripts without the proxy parameter:
| |
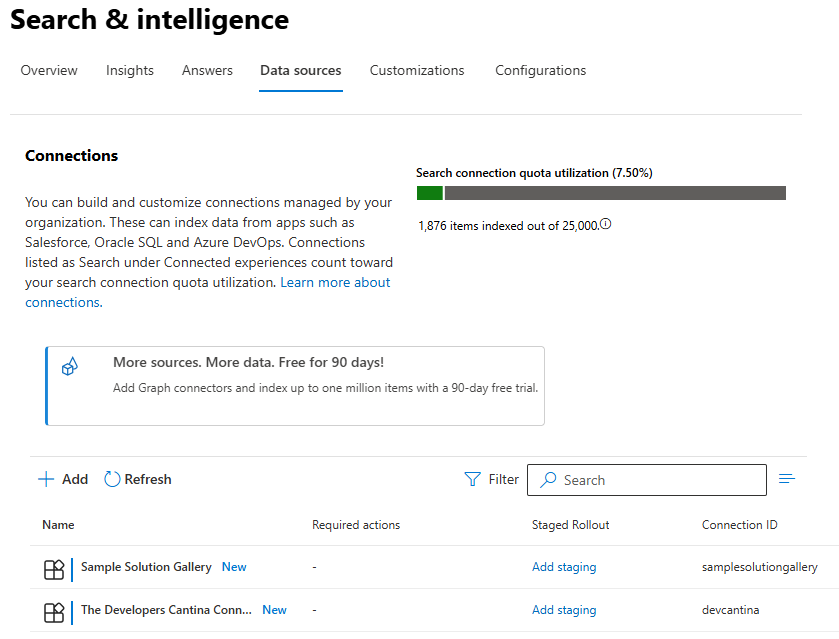
After both operations are completed, you will find the connector available in the Search & Intelligence section of the Microsoft 365 Admin Center:
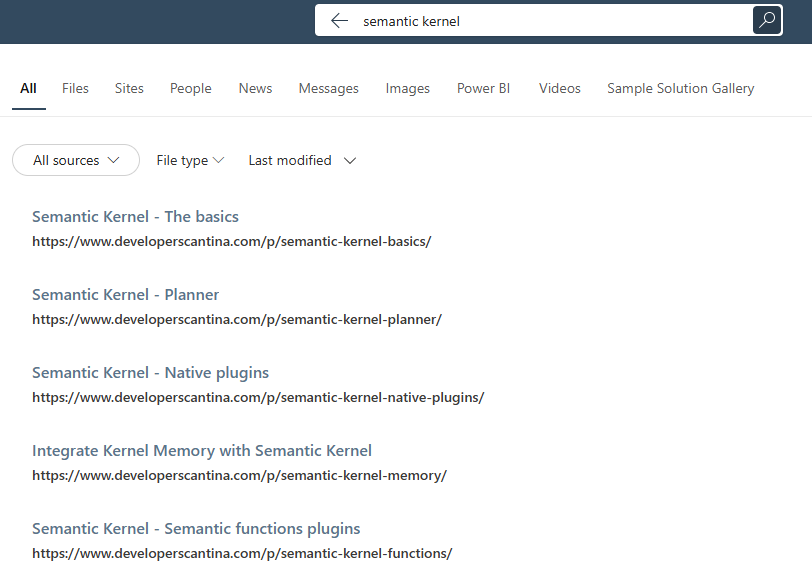
And if you go over to Microsoft365.com and you search for a topic that is covered by one of the posts of this blog, you will see the results of the connector:
Conclusion
Graph Connectors are a very powerful way to bring external data into the Microsoft 365 ecosystem. However, building a custom one might not be the simplest experience, since there are lot of factors to keep in consideration: the connection, the schema, the content ingestion, the results layout, the authentication, etc. Thanks to new project generator we have introduced in this post, now it’s a little bit easier to create a Graph Connector from scratch, since we can focus only the data we want to ingest, rather than on the technical implementations.
You can find the sample connector I’ve created in this post on GitHub.
Happy coding!